语雀文档库: https://www.yuque.com/imoyt/zssuuf
一、 递归树形结构获取数据 在注册中心中“product”命名空间中,创建“gulimall-product.yml”配置文件:
将“application.yml”内容拷贝到该配置文件中
1
2
3
4
5
6
7
8
9
10
11
12
13
14
15
16
17
18
19
20
21
22
server: port: 10000 spring: datasource: driverClassName: com.mysql.cj.jdbc.Driver url: jdbc:mysql://192.168.137.14:3306/gulimall_pms?useUnicode=true&characterEncoding=UTF-8&useSSL=false username: root password: root application: name: gulimall-product cloud: nacos: discovery: server-addr: 192.168 .137 .14 :8848 mybatis-plus: global-config: db-config: id-type: auto mapper-locations: classpath:/mapper/**/*.xml
在本地创建“bootstrap.properties”文件,指明配置中心的位置和使用到的配置文件:
1
2
3
4
5
6
spring.application.name =gulimall-product spring.cloud.nacos.config.server-addr =192.168.137.14:8848 spring.cloud.nacos.config.namespace =3c50ffaa-010b-4b59-9372-902e35059232 spring.cloud.nacos.config.extension-configs[0].data-id =gulimall-product.yml spring.cloud.nacos.config.extension-configs[0].group =DEFAULT_GROUP spring.cloud.nacos.config.extension-configs[0].refresh =true
然后启动 gulimall-product,查看到该服务已经出现在了 nacos 的注册中心中了
修改“io.niceseason.gulimall.product.service.CategoryService”类,添加如下代码:
1 2 3 4 5 6 7 8 9 @RequestMapping("/list/tree") public List<CategoryEntity> list () { List<CategoryEntity> categoryEntities = categoryService.listWithTree(); return categoryEntities; }
测试:http://localhost:10000/product/category/list/tree
如何区别是哪种分类级别?
答:可以通过分类的 parent_cid 来进行判断,如果是一级分类,其值为 0.
1 2 3 4 5 6 7 8 9 10 11 12 13 14 15 16 17 18 19 20 21 22 23 24 25 26 27 28 29 30 31 32 33 34 35 36 37 38 39 @RequestMapping("/list/tree") public List<CategoryEntity> list () { List<CategoryEntity> categoryEntities = categoryService.listWithTree(); List<CategoryEntity> level1Menus = categoryEntities.stream() .filter(item -> item.getParentCid() == 0 ) .map(menu->{ menu.setChildCategoryEntity(getChildrens(menu,categoryEntities)); return menu; }) .sorted((menu1, menu2) -> { return (menu1.getSort() ==null ? 0 :menu1.getSort())- (menu2.getSort()==null ?0 :menu2.getSort()); }) .collect(Collectors.toList()); return level1Menus; } public List<CategoryEntity> getChildrens (CategoryEntity root,List<CategoryEntity> all) { List<CategoryEntity> childrens = all.stream().filter(item -> { return item.getParentCid() == root.getCatId(); }).map(item -> { item.setChildCategoryEntity(getChildrens(item, all)); return item; }).sorted((menu1, menu2) -> { return (menu1.getSort() ==null ? 0 :menu1.getSort())- (menu2.getSort()==null ?0 :menu2.getSort()); }).collect(Collectors.toList()); return childrens; }
下面是得到的部分 JSON 数据
1
2
3
4
5
6
7
8
9
10
11
12
13
14
15
16
17
18
19
20
21
22
23
24
25
26
27
28
29
30
31
32
33
34
35
36
37
38
39
40
41
42
43
44
45
46
47
48
49
50
51
52
53
54
55
56
57
58
59
60
61
62
63
64
65
66
67
68
69
70
71
72
73
74
75
76
77
78
79
80
81
82
83
84
85
86
87
88
89
90
91
92
93
94
95
96
97
98
99
100
101
102
103
104
105
106
107
108
109
110
111
112
113
114
115
116
117
118
119
120
121
122
123
[ { "catId" : 1 , "name" : "图书、音像、电子书刊" , "parentCid" : 0 , "catLevel" : 1 , "showStatus" : 1 , "sort" : 0 , "icon" : null , "productUnit" : null , "productCount" : 0 , "childCategoryEntity" : [ { "catId" : 22 , "name" : "电子书刊" , "parentCid" : 1 , "catLevel" : 2 , "showStatus" : 1 , "sort" : 0 , "icon" : null , "productUnit" : null , "productCount" : 0 , "childCategoryEntity" : [ { "catId" : 165 , "name" : "电子书" , "parentCid" : 22 , "catLevel" : 3 , "showStatus" : 1 , "sort" : 0 , "icon" : null , "productUnit" : null , "productCount" : 0 , "childCategoryEntity" : [ ] } , { "catId" : 166 , "name" : "网络原创" , "parentCid" : 22 , "catLevel" : 3 , "showStatus" : 1 , "sort" : 0 , "icon" : null , "productUnit" : null , "productCount" : 0 , "childCategoryEntity" : [ ] } , { "catId" : 167 , "name" : "数字杂志" , "parentCid" : 22 , "catLevel" : 3 , "showStatus" : 1 , "sort" : 0 , "icon" : null , "productUnit" : null , "productCount" : 0 , "childCategoryEntity" : [ ] } , { "catId" : 168 , "name" : "多媒体图书" , "parentCid" : 22 , "catLevel" : 3 , "showStatus" : 1 , "sort" : 0 , "icon" : null , "productUnit" : null , "productCount" : 0 , "childCategoryEntity" : [ ] } ] } , { "catId" : 23 , "name" : "音像" , "parentCid" : 1 , "catLevel" : 2 , "showStatus" : 1 , "sort" : 0 , "icon" : null , "productUnit" : null , "productCount" : 0 , "childCategoryEntity" : [ { "catId" : 169 , "name" : "音乐" , "parentCid" : 23 , "catLevel" : 3 , "showStatus" : 1 , "sort" : 0 , "icon" : null , "productUnit" : null , "productCount" : 0 , "childCategoryEntity" : [ ] } , { "catId" : 170 , "name" : "影视" , "parentCid" : 23 , "catLevel" : 3 , "showStatus" : 1 , "sort" : 0 , "icon" : null , "productUnit" : null , "productCount" : 0 , "childCategoryEntity" : [ ] } , { "catId" : 171 , "name" : "教育音像" , "parentCid" : 23 , "catLevel" : 3 , "showStatus" : 1 , "sort" : 0 , "icon" : null , "productUnit" : null , "productCount" : 0 , "childCategoryEntity" : [ ] } ] } , {
启动后端项目 renren-fast
启动前端项目 renren-fast-vue:
访问: http://localhost:8001/#/login
创建一级菜单:
创建完成后,在后台的管理系统中会创建一条记录:
然后创建子菜单:
创建 renren-fast-vue\src\views\modules\product 目录,子所以是这样来创建,是因为 product/category,对应于 product-category
在该目录下,新建“category.vue”文件:
1 2 3 4 5 6 7 8 9 10 11 12 13 14 15 16 17 18 19 20 21 22 23 24 25 26 27 28 29 30 31 32 33 34 35 36 37 38 39 40 41 42 43 44 45 46 47 48 49 50 51 52 53 54 55 56 57 58 59 60 61 <template > <el-tree :data ="menus" :props ="defaultProps" @node-click ="handleNodeClick" > </el-tree > </template > <script > export default { components : {}, computed : {}, watch : {}, data ( return { menus : [], defaultProps : { children : "childrens" , label : "name" }, } }, methods : { handleNodeClick (data ) { console .log (data); }, getMenus ( this .dataListLoading = true ; this .$http({ url : this .$http .adornUrl ("/product/category/list/tree" ), method : "get" }).then (({ data } ) => { console .log ("获取到数据" , data); this .menus =data; }); } }, created ( this .getMenus (); }, mounted ( beforeCreate ( beforeMount ( beforeUpdate ( updated ( beforeDestroy ( destroyed ( activated ( }; </script > <style scoped >
刷新页面出现 404 异常,查看请求发现,请求的是“http://localhost:8080/renren-fast/product/category/list/tree”
这个请求是不正确的,正确的请求是:http://localhost:10000/product/category/list/tree,
修正这个问题:
替换“static\config\index.js”文件中的“window.SITE_CONFIG[‘baseUrl’]”
替换前:
1 window.SITE_CONFIG['baseUrl'] = 'http://localhost:8080/renren-fast';
替换后:
1 window.SITE_CONFIG['baseUrl'] = 'http://localhost:88/api';
http://localhost:88,这个地址是我们网关微服务的接口。
这里我们需要通过网关来完成路径的映射,因此将 renren-fast 注册到 nacos 注册中心中,并添加配置中心
1
2
3
4
5
6
7
8
9
10
11
application: name: renren-fast cloud: nacos: discovery: server-addr: 192.168 .137 .14 :8848 config: name: renren-fast server-addr: 192.168 .137 .8848 namespace: ee409c3f-3206-4a3b-ba65-7376922a886d
配置网关路由,前台的所有请求都是经由“http://localhost:88/api”来转发的,在“gulimall-gateway”中添加路由规则:
1
2
3
4
- id: admin_route uri: lb://renren-fast predicates: - Path=/api/**
但是这样做也引入了另外的一个问题,再次访问:http://localhost:8001/#/login,发现验证码不再显示:
分析原因:
现在的验证码请求路径为,http://localhost:88/api/captcha.jpg?uuid=69c79f02-d15b-478a-8465-a07fd09001e6 原始的验证码请求路径:http://localhost:8001/renren-fast/captcha.jpg?uuid=69c79f02-d15b-478a-8465-a07fd09001e6 在 admin_route 的路由规则下,在访问路径中包含了“api”,因此它会将它转发到 renren-fast,网关在转发的时候,会使用网关的前缀信息,为了能够正常的取得验证码,我们需要对请求路径进行重写
关于请求路径重写:
6.16. The RewritePath GatewayFilter Factory
The RewritePath GatewayFilter factory takes a path regexp parameter and a replacement parameter. This uses Java regular expressions for a flexible way to rewrite the request path. The following listing configures a RewritePath GatewayFilter:
Example 41. application.yml
1
2
3
4
5
6
7
8
9
10
spring: cloud: gateway: routes: - id: rewritepath_route uri: https://example.org predicates: - Path=/foo/** filters: - RewritePath=/red(?<segment>/?.*), $\{segment}
For a request path of /red/blue, this sets the path to /blue before making the downstream request. Note that the $ should be replaced with $\ because of the YAML specification.
修改“admin_route”路由规则:
1
2
3
4
5
6
- id: admin_route uri: lb://renren-fast predicates: - Path=/api/** filters: - RewritePath=/api/(?<segment>/?.*), /renren-fast/$\{segment}
再次访问:http://localhost:8001/#/login,验证码能够正常的加载了。
但是很不幸新的问题又产生了,访问被拒绝了
问题描述:已拦截跨源请求:同源策略禁止读取位于 http://localhost:88/api/sys/login 的远程资源。(原因:CORS 头缺少 ‘Access-Control-Allow-Origin’)。
问题分析:这是一种跨域问题。访问的域名和端口和原来的请求不同,请求就会被限制
跨域流程:
解决方法:在网关中定义“GulimallCorsConfiguration”类,该类用来做过滤,允许所有的请求跨域。
1
2
3
4
5
6
7
8
9
10
11
12
13
14
15
16
@Configuration public class GulimallCorsConfiguration { @Bean public CorsWebFilter corsWebFilter () { UrlBasedCorsConfigurationSource source=new UrlBasedCorsConfigurationSource (); CorsConfiguration corsConfiguration = new CorsConfiguration (); corsConfiguration.addAllowedHeader("*" ); corsConfiguration.addAllowedMethod("*" ); corsConfiguration.addAllowedOrigin("*" ); corsConfiguration.setAllowCredentials(true ); source.registerCorsConfiguration("/**" ,corsConfiguration); return new CorsWebFilter (source); } }
再次访问:http://localhost:8001/#/login
http://localhost:8001/renre 已拦截跨源请求:同源策略禁止读取位于 http://localhost:88/api/sys/login 的远程资源。(原因:不允许有多个 ‘Access-Control-Allow-Origin’ CORS 头)n-fast/captcha.jpg?uuid=69c79f02-d15b-478a-8465-a07fd09001e6
出现了多个请求,并且也存在多个跨源请求。
为了解决这个问题,需要修改 renren-fast 项目,注释掉“io.renren.config.CorsConfig”类。然后再次进行访问。
在显示分类信息的时候,出现了 404 异常,请求的 http://localhost:88/api/product/category/list/tree 不存在
这是因为网关上所做的路径映射不正确,映射后的路径为 http://localhost:8001/renren-fast/product/category/list/tree
但是只有通过 http://localhost:10000/product/category/list/tree 路径才能够正常访问,所以会报 404 异常。
解决方法就是定义一个 product 路由规则,进行路径重写:
1
2
3
4
5
6
- id: product_route uri: lb://gulimall-product predicates: - Path=/api/product/** filters: - RewritePath=/api/(?<segment>/?.*),/$\{segment}
在路由规则的顺序上,将精确的路由规则放置到模糊的路由规则的前面,否则的话,精确的路由规则将不会被匹配到,类似于异常体系中 try catch 子句中异常的处理顺序。
抽取代码片段 vue.code-snippets
1
2
3
4
5
6
7
8
9
10
11
12
13
14
15
16
17
18
19
20
21
22
23
24
25
{ "http-get请求" : { "prefix" : "httpget" , "body" : [ "this.\\$http({" , "url:this.\\$http.adornUrl('')," , "method:'get'," , "params:this.\\$http.adornParams({})" , "}).then(({data})=>{" , "})" ] , "description" : "httpGET请求" } , "http-post请求" : { "prefix" : "httppost" , "body" : [ "this.\\$http({" , "url:this.\\$http.adornUrl('')," , "method:'post'," , "data: this.\\$http.adornData(data, false)" , "}).then(({data})=>{ })" ] , "description" : "httpPOST请求" } }
二、删除/添加数据 添加 delete 和 append 标识,并且增加复选框
1
2
3
4
5
6
7
8
9
10
11
12
13
14
15
16
17
18
19
20
<el-tree :data="menus" show-checkbox //显示复选框 :props="defaultProps" :expand-on-click-node="false" //设置节点点击时不展开 node-key="catId" > <span class="custom-tree-node" slot-scope="{ node, data }"> <span>{{ node.label }}</span> <span> <el-button v-if="node.level <= 2" type="text" size="mini" @click="() => append(data)">Append</el-button> <el-button v-if="node.childNodes.length == 0" type="text" size="mini" @click="() => remove(node, data)" >Delete</el-button> </span> </span> </el-tree>
测试删除数据,打开 postman 输入“ http://localhost:88/api/product/category/delete ”,请求方式设置为 POST,为了比对效果,可以在删除之前查询数据库的 pms_category 表:
由于 delete 请求接收的是一个数组,所以这里使用 JSON 方式,传入了一个数组:
再次查询数据库能够看到 cat_id 为 1000 的数据已经被删除了。
修改“io.niceseason.gulimall.product.controller.CategoryController”类,添加如下代码:
1
2
3
4
5
6
7
8
@RequestMapping("/delete") public R delete (@RequestBody Long[] catIds) { categoryService.removeMenuByIds(Arrays.asList(catIds)); return R.ok(); }
io.niceseason.gulimall.product.service.impl.CategoryServiceImpl
1
2
3
4
5
6
@Override public void removeMenuByIds (List<Long> asList) { baseMapper.deleteBatchIds(asList); }
然而多数时候,我们并不希望删除数据,而是标记它被删除了,这就是逻辑删除;
可以设置 show_status 为 0,标记它已经被删除。
mybatis-plus 的逻辑删除:
配置全局的逻辑删除规则,在“src/main/resources/application.yml”文件中添加如下内容:
1
2
3
4
5
6
mybatis-plus: global-config: db-config: id-type: auto logic-delete-value: 1 logic-not-delete-value: 0
修改“io.niceseason.gulimall.product.entity.CategoryEntity”类,添加上@TableLogic,表明使用逻辑删除:
1 2 3 4 5 @TableLogic(value = "1",delval = "0") private Integer showStatus;
然后在 POSTMan 中测试一下是否能够满足需要。另外在“src/main/resources/application.yml”文件中,设置日志级别,打印出 SQL 语句:
1
2
3
logging: level: io.niceseason.gulimall.product: debug
打印的日志:
1
2
3
4
==> Preparing: UPDATE pms_category SET show_status=0 WHERE cat_id IN ( ? ) AND show_status=1 ==> Parameters: 1431 (Long) <== Updates: 1 get changedGroupKeys:[]
删除细节优化
1
2
3
4
5
6
7
8
9
10
11
12
13
14
15
16
17
18
19
20
21
22
23
24
25
26
27
28
29
30
remove (node, data ) { var ids = [data.catId ]; this .$confirm(`是否删除【${data.name} 】菜单?` , "提示" , { confirmButtonText : "确定" , cancelButtonText : "取消" , type : "warning" , }) .then (() => { this .$http({ url : this .$http .adornUrl ("/product/category/delete" ), method : "post" , data : this .$http .adornData (ids, false ), }).then (({ data } ) => { this .$message({ message : "菜单删除成功" , type : "success" , }); this .getMenus (); this .expandedKey = [node.parent .data .catId ]; }); }) .catch (() => {}); console .log ("remove" , node, data); },
添加数据
在模板上添加分类对话框
1 2 3 4 5 6 7 8 9 10 11 <el-dialog title ="添加分类" :visible.sync ="dialogFormVisible" > <el-form :model ="category" > <el-form-item label ="分类名称" > <el-input v-model ="category.name" autocomplete ="off" > </el-input > </el-form-item > </el-form > <div slot ="footer" class ="dialog-footer" > <el-button @click ="dialogFormVisible = false" > 取 消</el-button > <el-button type ="primary" @click ="addCategory" > 确 定</el-button > </div > </el-dialog >
在 data 属性中增加对话框显示属性dialogFormVisible和提交数据category
1
2
3
4
5
6
7
8
9
10
11
12
13
14
15
16
17
18
19
20
21
22
23
24
data ( return { menus : [], defaultProps : { children : "childrens" , label : "name" , }, expandedKey : [], dialogFormVisible : false , category : { name :"" , parentCid : 0 , catLevel : 0 , showStatus : 1 , sort : 0 , productUnit : "" , icon : "" , catId : null , }, }; },
分别添加添加和确定对应函数
1 2 3 4 5 6 7 8 9 10 11 12 13 14 15 16 17 18 19 20 21 22 23 24 25 26 27 28 29 30 31 32 33 34 35 36 append (data ) { console .log ("添加数据" , data); this .dialogFormVisible =true ; this .category .parentCid = data.catId ; this .category .catLevel = data.catLevel * 1 + 1 ; this .category .catId = null ; this .category .name = "" ; this .category .icon = "" ; this .category .productUnit = "" ; this .category .sort = 0 ; this .category .showStatus = 1 ; }, addCategory ( this .$http({ url : this .$http .adornUrl ('/product/category/save' ), method : 'post' , data : this .$http .adornData (this .category , false ) }).then (({ data } ) => { this .$message({ message : "菜单保存成功" , type : "success" , }); this .dialogFormVisible = false ; this .getMenus (); this .expandedKey = [this .category .parentCid ]; }); }, },
三、修改数据 添加修改按钮
1 <el-button type ="text" size ="mini" @click ="() => edit(data)" > Edit</el-button >
使对话框回显数据并显示标题修改分类,由于与 增加分类公用统一对话框,所以需要添加属性title并定制函数submitData()
1 2 3 4 5 6 7 8 9 10 11 12 13 14 15 16 17 <el-dialog :title ="title" :visible.sync ="dialogFormVisible" > <el-form :model ="category" > <el-form-item label ="分类名称" > <el-input v-model ="category.name" autocomplete ="off" > </el-input > </el-form-item > <el-form-item label ="图标" > <el-input v-model ="category.icon" autocomplete ="off" > </el-input > </el-form-item > <el-form-item label ="计量单位" > <el-input v-model ="category.productUnit" autocomplete ="off" > </el-input > </el-form-item > </el-form > <div slot ="footer" class ="dialog-footer" > <el-button @click ="dialogFormVisible = false" > 取 消</el-button > <el-button type ="primary" @click ="submitData" > 确 定</el-button > </div > </el-dialog >
1
2
3
4
5
6
7
8
9
10
11
12
13
14
15
16
17
18
19
20
21
22
23
24
25
26
27
28
29
30
31
32
33
34
35
36
37
38
39
40
41
42
43
44
45
46
47
48
49
50
51
52
53
54
55
56
57
58
59
60
61
62
63
64
65
66
67
68
69
data ( return { menus : [], defaultProps : { children : "childrens" , label : "name" , }, expandedKey : [], dialogFormVisible : false , category : { catId : null , name : "" , parentCid : 0 , catLevel : 0 , showStatus : 1 , sort : 0 , productUnit : "" , icon : "" , catId : null , }, title : "" , dialogType : "" }; }, edit (data ) { this .title = "修改分类" , this .dialogFormVisible = true , this .dialogType ="edit" , console .log ("修改数据" , data); this .$http({ url : this .$http .adornUrl (`/product/category/info/${data.catId} ` ), method : "get" , }).then (({ data } ) => { console .log ("回显数据" , data.category ); this .category = data.category ; }); }, editCategory ( var {catId,name,icon,productUnit}=this .category ; this .$http({ url : this .$http .adornUrl ("/product/category/update" ), method : "post" , data : this .$http .adornData ({catId,name,icon,productUnit}, false ), }).then (({ data } ) => { this .$message({ message : "菜单修改成功" , type : "success" , }); this .dialogFormVisible = false ; this .getMenus (); this .expandedKey = [this .category .parentCid ]; }); }, submitData ( this .dialogType =="add" ?this .addCategory ():this .editCategory (); }, },
四、菜单拖动 开启拖拽功能
在<el-tree>添加属性draggable开启拖拽功能
1 2 3 4 5 6 7 8 9 10 11 12 13 14 15 16 17 18 19 20 21 22 23 24 25 26 <el-tree :data ="menus" 绑定的变量 :props ="defaultProps" 配置选项 :expand-on-click-node ="false" 只有点击箭头才会展开收缩 show-checkbox 显示多选框 node-key ="catId" 数据库的id作为node id :default-expanded-keys ="expandedKey" 默认展开的数组 :draggable ="draggable" 开启拖拽功能 :allow-drop ="allowDrop" 是否允许拖拽到目标结点 ,函数为Function (draggingNode源结点 , dropNode目标结点 , type前中后类型 ) @node-drop ="handleDrop" 拖拽成功处理函数 ,函数为Function (draggingNode源结点 , dropNode拖拽成功后的父结点 , type前中后类型 ) ref ="menuTree" > </el-tree >
限制可拖拽范围
由于我们的菜单是三级分类,所以未防止超出三级的情况,有部分情况不允许被拖入:比如被拖拽的节点本身包含两级菜单,将其拖进第二层级的节点,那么最深层级就达到了四级,为防止这种情况的出现,我们需要编写在<el-tree>中绑定allow-drop属性并编写allowDrop()函数
allowDrop()的思路为将被拖拽节点的子节点通过递归遍历找出最深节点的level,然后将被拖拽节点的相对深度与目标节点的相对深度相加,看是否超出最大深度 3
函数参数:
draggingNode:正在拖拽的结点dropNode:拓展成功后的父节点,我们把他称为目的父节点 type:分为 before、after、inner。拖拽到某个结点上还是两个结点之间1 2 3 4 5 6 7 8 9 10 11 12 13 14 15 16 17 18 19 20 21 22 23 24 25 26 27 28 29 30 31 32 allowDrop (draggingNode, dropNode, type ){ console .log ("拖拽节点" ,draggingNode,dropNode,type); this .maxLevel =draggingNode.level ; this .countNodeLevel (draggingNode); let deep=(this .maxLevel -draggingNode.level )+1 ; console .log ("deep:" ,deep,"maxlevel:" ,this .maxLevel ,"dragging:" ,draggingNode.level ); if (type=="inner" ){ return deep+dropNode.level <=3 ; }else { return deep+dropNode.parent .level <=3 ; } }, countNodeLevel (node ){ if (node.childNodes !=null &&node.childNodes .length !=0 ){ for (let i=0 ;i<node.childNodes .length ;i++){ if (node.childNodes [i].level >this .maxLevel ){ this .maxLevel =node.childNodes [i].level ; } this .countNodeLevel (node.childNodes [i]); } } },
拖拽合法性
我们得到了子树的深度 deep,就可以判断这个拖拽合不合法:
拖拽类型:以拖拽后新的父结点为基准分为:
结点前、后(两个结点之间):
1 deep + dropNode.parent .level <= 3 ;
中(结点上):
1 deep + dropNode.level <= 3 ;
拖拽完成
拖拽完成后我们需要更新三个状态:
当前节点最新的父节点 id,
当前拖拽节点的最新顺序
遍历姊妹节点的顺序即为新顺序
当前拖拽节点的最新层级
当前拖拽层级变化需要更新拖拽节点及其子节点
拖拽完成后需要更新变化的节点,根据被拖拽节点的防止位置的不同,变化的部分也有所不同
inner
父节点为dropNode节点
姊妹节点为dropNode的孩子节点
before/after
父节点为dropNode的父节点
姊妹节点为dropNode的父节点的孩子节点
1 2 3 4 5 6 7 8 9 10 11 12 13 14 15 16 17 18 19 20 21 22 23 24 25 26 27 28 29 30 31 32 33 34 35 36 37 38 39 40 41 42 43 44 45 46 47 48 49 50 51 52 53 54 handleDrop (draggingNode, dropNode, dropType, ev ) { let pCid=0 ; let siblings=null ; if (dropType=="inner" ){ pCid=dropNode.data .catId ; siblings=dropNode.childNodes ; }else { pCid=dropNode.parent .data .catId ==undefined ?0 :dropNode.parent .data .catId ; siblings=dropNode.parent .childNodes ; } this .pCid .push (pCid); for (let i=0 ;i<siblings.length ;i++){ if (siblings[i].data .catId ==draggingNode.data .catId ){ let catLevel=draggingNode.catLevel ; if (catLevel!=draggingNode.level ){ this .updateChildNodeLevel (siblings[i]); catLevel=draggingNode.level ; } this .updateNodes .push ({ catId :siblings[i].data .catId , catLevel, sort :i, parentCid :pCid, }); }else { this .updateNodes .push ({ catId :siblings[i].data .catId , sort :i, }); } } console .log (this .updateNodes ); }, updateChildNodeLevel (node ){ if (node.childNodes .length >0 ){ for (let i=0 ;i<node.childNodes .length ;i++){ this .updateNodes .push ({ catId :node.childNodes [i].data .catId , catLevel :node.childNodes [i].level , }); this .updateChildNodeLevel (node.childNodes [i]); } } },
修改分类 controller
1 2 3 4 5 6 7 8 9 @RequestMapping("/update/sort") public R updateSort (@RequestBody CategoryEntity[] category) { categoryService.updateBatchById(Arrays.asList(category)); return R.ok(); }
设置菜单拖动开关
1 2 3 4 5 6 <el-switch v-model="draggable" active-text="开启拖拽" inactive-text="关闭拖拽" ></el-switch> <el-button v-if="draggable" @click="batchSave">批量保存</el-button>
现在存在的一个问题是每次拖拽的时候,都会发送请求,更新数据库这样频繁的与数据库交互,现在想要实现一个拖拽过程中不更新数据库,拖拽完成后,通过批量保存统一提交拖拽后的数据。
<el-button v-if="draggable" @click="batchSave">批量保存</el-button>
v-if 是指开启开关后才显示 开启拖拽后应该使用的是 node 信息,而不是数据库信息,因为还没同步到数据库。把相关的信息都修改 之前为了防止上次数据遗落,归零了展开列表,这样列表又不展开了 1 2 3 4 5 6 7 8 9 10 11 12 13 14 15 16 17 18 19 20 batchSave ( this .$http({ url : this .$http .adornUrl ('/product/category/update/sort' ), method : 'post' , data : this .$http .adornData (this .updateNodes , false ) }).then (({ data } ) => { this .$message({ message : "菜单顺序等修改成功" , type : "success" }); this .getMenus (); this .expandedKey = this .pCid ; this .updateNodes = []; this .maxLevel = 0 ; }); }
现在还存在一个问题,如果是将一个菜单连续的拖拽,最终还放到了原来的位置,但是 updateNode 中却出现了很多节点更新信息,这样显然也是一个问题。
批量删除 添加删除按钮
1 2 3 4 5 6 <el-button type="danger" plain size="small" @click="batchDelete" >批量删除</el-button>
在<el-tree>中添加 ref="tree"属性以获得选中节点
1 2 3 4 5 6 7 8 9 10 11 12 13 14 15 16 17 18 19 20 21 22 23 24 25 26 27 28 29 30 31 32 33 batchDelete ( let checkNodes = this .$refs .tree .getCheckedNodes (); let ids=[]; let names=[]; for (let i=0 ;i<checkNodes.length ;i++){ ids.push (checkNodes[i].catId ); names.push (checkNodes[i].name ); } this .$confirm(`是否删除【${names} 】菜单?` , "提示" , { confirmButtonText : "确定" , cancelButtonText : "取消" , type : "warning" , }).then (()=> { this .$http({ url : this .$http .adornUrl ('/product/category/delete' ), method : 'post' , data : this .$http .adornData (ids, false ) }).then (() => { this .$message({ message : "批量删除成功" , type : "success" }); this .getMenus (); }); } ).catch (); },
五、品牌管理菜单
(2)将“”逆向工程得到的 resources\src\views\modules\product 文件拷贝到 gulimall/renren-fast-vue/src/views/modules/product 目录下,也就是下面的两个文件
brand.vue brand-add-or-update.vue
但是显示的页面没有新增和删除功能,这是因为权限控制的原因,
1 2 3 4 5 6 7 8 9 10 11 <el-button v-if="isAuth('product:brand:save')" type="primary" @click="addOrUpdateHandle()" >新增</el-button> <el-button v-if="isAuth('product:brand:delete')" type="danger" @click="deleteHandle()" :disabled="dataListSelections.length <= 0" >批量删除</el-button>
查看“isAuth”的定义位置:
它是在“index.js”中定义,现在将它设置为返回值为 true,即可显示添加和删除功能。
再次刷新页面能够看到,按钮已经出现了:
添加“显示状态按钮” brand.vue
1 2 3 4 5 6 7 8 9 10 11 12 13 14 15 16 17 18 19 20 21 22 23 24 25 26 27 28 <template slot-scope="scope"> scope属性包含了一整行数据 定义显示效果 <el-switch v-model="scope.row.showStatus" active-color="#13ce66" inactive-color="#ff4949" @change="updateBrandStatus(scope.row)" 变化会调用函数 :active-value = "1" :inactive-value = "0" ></el-switch> </template> 另外导入了 <script> import AddOrUpdate from "./brand-add-or-update"; 他作为弹窗被brand.vue使用 <!-- 弹窗, 新增 / 修改 --> <add-or-update v-if="addOrUpdateVisible" ref="addOrUpdate" @refreshDataList="getDataList"></add-or-update> AddOrUpdate具体是个会话窗 <template> <el-dialog :title="!dataForm.id ? '新增' : '修改'" :close-on-click-modal="false" :visible.sync="visible" > dataForm.id 修改为 dataForm.brandId 不然新增和修改会显示错误
brand-add-or-update.vue
1 2 3 4 5 6 7 8 9 <el-form-item label="显示状态" prop="showStatus"> <el-switch v-model="dataForm.showStatus" active-color="#13ce66" inactive-color="#ff4949" :active-value="1" :inactive-value="0" > </el-switch> </el-form-item>
1 2 3 4 5 6 7 8 9 10 11 12 13 14 15 16 17 updateBrandStatus (data ) { console .log ("最新状态" , data); let {brandId,showStatus} = data; this .$http({ url : this .$http .adornUrl ("/product/brand/update" ), method : "post" , data : this .$http .adornData ({brandId,showStatus}, false ) }).then (({ data } ) => { this .$message({ message : "状态更新成功" , type : "success" }); }); },
更新品牌对应的 controller
1 2 3 4 5 6 7 8 9 10 11 @RestController @RequestMapping("product/brand") public class BrandController { @RequestMapping("/update") public R update (@RequestBody BrandEntity brand) { brandService.updateById(brand); return R.ok(); }
品牌实体
1 2 3 4 5 6 7 8 9 10 11 12 13 14 15 16 17 18 19 20 21 22 23 @Data @TableName("pms_brand") public class BrandEntity implements Serializable { private static final long serialVersionUID = 1L ; @TableId private Long brandId; private String name; private String logo; private String descript; private Integer showStatus; private String firstLetter; private Integer sort; }
添加上传 和传统的单体应用不同,这里我们选择将数据上传到分布式文件服务器上。
这里我们选择将图片放置到阿里云上,使用对象存储。
阿里云上使使用对象存储方式:
创建 Bucket
上传文件:
上传成功后,取得图片的 URL
这种方式是手动上传图片,实际上我们可以在程序中设置自动上传图片到阿里云对象存储。
上传模型:
查看阿里云关于文件上传的帮助: https://help.aliyun.com/document_detail/32009.html?spm=a2c4g.11186623.6.768.549d59aaWuZMGJ
1、添加依赖包 在 Maven 项目中加入依赖项(推荐方式)
在 Maven 工程中使用 OSS Java SDK,只需在 pom.xml 中加入相应依赖即可。以 3.8.0 版本为例,在内加入如下内容:
1 2 3 4 5 <dependency > <groupId > com.aliyun.oss</groupId > <artifactId > aliyun-sdk-oss</artifactId > <version > 3.8.0</version > </dependency >
2、上传文件流 以下代码用于上传文件流:
1 2 3 4 5 6 7 8 9 10 11 12 13 14 15 String endpoint = "http://oss-cn-hangzhou.aliyuncs.com" ;String accessKeyId = "<yourAccessKeyId>" ;String accessKeySecret = "<yourAccessKeySecret>" ;OSS ossClient = new OSSClientBuilder ().build(endpoint, accessKeyId, accessKeySecret);InputStream inputStream = new FileInputStream ("<yourlocalFile>" );ossClient.putObject("<yourBucketName>" , "<yourObjectName>" , inputStream); ossClient.shutdown();
endpoint 的取值:
accessKeyId 和 accessKeySecret 需要创建一个 RAM 账号:
创建用户完毕后,会得到一个“AccessKey ID”和“AccessKeySecret”,然后复制这两个值到代码的“AccessKey ID”和“AccessKeySecret”。
另外还需要添加访问控制权限:
1 2 3 4 5 6 7 8 9 10 11 12 13 14 15 16 17 18 19 @Test public void testUpload () throws FileNotFoundException { String endpoint = "oss-cn-shanghai.aliyuncs.com" ; String accessKeyId = "LTAI4G4W1RA4JXz2QhoDwHhi" ; String accessKeySecret = "R99lmDOJumF2x43ZBKT259Qpe70Oxw" ; OSS ossClient = new OSSClientBuilder ().build(endpoint, accessKeyId, accessKeySecret); InputStream inputStream = new FileInputStream ("C:\\Users\\Administrator\\Pictures\\timg.jpg" ); ossClient.putObject("gulimall-images" , "time.jpg" , inputStream); ossClient.shutdown(); System.out.println("上传成功." ); }
更为简单的使用方式,是使用 SpringCloud Alibaba
详细使用方法,见: https://help.aliyun.com/knowledge_detail/108650.html
(1)添加依赖
1 2 3 4 5 <dependency > <groupId > com.alibaba.cloud</groupId > <artifactId > spring-cloud-starter-alicloud-oss</artifactId > <version > 2.2.0.RELEASE</version > </dependency >
(2)创建“AccessKey ID”和“AccessKeySecret”
(3)配置 key,secret 和 endpoint 相关信息
1 2 3 4 access-key: LTAI4G4W1RA4JXz2QhoDwHhi secret-key: R99lmDOJumF2x43ZBKT259Qpe70Oxw oss: endpoint: oss-cn-shanghai.aliyuncs.com
(4)注入 OSSClient 并进行文件上传下载等操作
但是这样来做还是比较麻烦,如果以后的上传任务都交给 gulimall-product 来完成,显然耦合度高。最好单独新建一个 Module 来完成文件上传任务。
其他方式 1)新建 gulimall-third-party 2)添加依赖,将原来 gulimall-common 中的“spring-cloud-starter-alicloud-oss”依赖移动到该项目中 1 2 3 4 5 6 7 8 9 10 11 12 13 14 15 16 17 <dependency > <groupId > com.alibaba.cloud</groupId > <artifactId > spring-cloud-starter-alicloud-oss</artifactId > <version > 2.2.0.RELEASE</version > </dependency > <dependency > <groupId > com.bigdata.gulimall</groupId > <artifactId > gulimall-common</artifactId > <version > 1.0-SNAPSHOT</version > <exclusions > <exclusion > <groupId > com.baomidou</groupId > <artifactId > mybatis-plus-boot-starter</artifactId > </exclusion > </exclusions > </dependency >
另外也需要在“pom.xml”文件中,添加如下的依赖管理
1 2 3 4 5 6 7 8 9 10 11 12 13 14 15 16 17 18 19 <dependencyManagement > <dependencies > <dependency > <groupId > org.springframework.cloud</groupId > <artifactId > spring-cloud-dependencies</artifactId > <version > ${spring-cloud.version}</version > <type > pom</type > <scope > import</scope > </dependency > <dependency > <groupId > com.alibaba.cloud</groupId > <artifactId > spring-cloud-alibaba-dependencies</artifactId > <version > 2.2.1.RELEASE</version > <type > pom</type > <scope > import</scope > </dependency > </dependencies > </dependencyManagement >
3)在主启动类中开启服务的注册和发现 4)在 nacos 中注册 (1)创建命名空间“ gulimall-third-party ”
(2)在“ gulimall-third-party”命名空间中,创建“ gulimall-third-party.yml”文件
1 2 3 4 5 6 7 spring: cloud: alicloud: access-key: LTAI4G4W1RA4JXz2QhoDwHhi secret-key: R99lmDOJumF2x43ZBKT259Qpe70Oxw oss: endpoint: oss-cn-shanghai.aliyuncs.com
5)编写配置文件 application.yml
1 2 3 4 5 6 7 8 9 10 11 12 13 14 server: port: 30000 spring: application: name: gulimall-third-party cloud: nacos: discovery: server-addr: 192.168 .137 .14 :8848 logging: level: io.niceseason.gulimall.product: debug
注意去网关里配置转发,/api/thirdparty/…的路径改完后只有/…,但是其他服务是不去服务名的
bootstrap.properties (2.2.x 版本)
1 2 3 4 5 6 spring.cloud.nacos.config.name =gulimall-third-party spring.cloud.nacos.config.server-addr =192.168.137.14:8848 spring.cloud.nacos.config.namespace =f995d8ee-c53a-4d29-8316-a1ef54775e00 spring.cloud.nacos.config.extension-configs[0].data-id =gulimall-third-party.yml spring.cloud.nacos.config.extension-configs[0].group =DEFAULT_GROUP spring.cloud.nacos.config.extension-configs[0].refresh =true
2.1.X 版本需要改一下
1 2 3 4 5 6 7 8 spring.application.name =gulimall-third-party spring.cloud.nacos.config.server-addr =127.0.0.1:8848 spring.cloud.nacos.config.namespace =d973fe23-62bf-454d-9d3c-7ab4beb556d3 spring.cloud.nacos.config.ext-config[0].data-id =gulimall-third-party.yml spring.cloud.nacos.config.ext-config[0].group =DEFAULT_GROUP spring.cloud.nacos.config.ext-config[0].refresh =true
6) 编写测试类 1 2 3 4 5 6 7 8 9 10 11 12 13 14 15 16 17 18 19 20 21 22 23 24 25 26 27 28 29 30 31 32 33 34 35 36 37 38 39 40 41 42 package io.niceseason.gulimall.thirdparty;import com.aliyun.oss.OSS;import com.aliyun.oss.OSSClient;import com.aliyun.oss.OSSClientBuilder;import org.junit.jupiter.api.Test;import org.springframework.beans.factory.annotation.Autowired;import org.springframework.boot.test.context.SpringBootTest;import java.io.FileInputStream;import java.io.FileNotFoundException;import java.io.InputStream;@SpringBootTest class GulimallThirdPartyApplicationTests { @Autowired OSSClient ossClient; @Test public void testUpload () throws FileNotFoundException { String endpoint = "oss-cn-shanghai.aliyuncs.com" ; String accessKeyId = "LTAI4G4W1RA4JXz2QhoDwHhi" ; String accessKeySecret = "R99lmDOJumF2x43ZBKT259Qpe70Oxw" ; OSS ossClient = new OSSClientBuilder ().build(endpoint, accessKeyId, accessKeySecret); InputStream inputStream = new FileInputStream ("C:\\Users\\Administrator\\Pictures\\timg.jpg" ); ossClient.putObject("gulimall-images" , "time3.jpg" , inputStream); ossClient.shutdown(); System.out.println("上传成功." ); } }
上面的逻辑中,我们的想法是先把字节流给服务器,服务器给阿里云,还是传到了服务器。我们需要一些前端代码完成这个功能,字节流就别来服务器了
改进:服务端签名后直传 https://help.aliyun.com/document_detail/31926.html?spm=a2c4g.11186623.6.1527.228d74b8V6IZuT
背景
采用 JavaScript 客户端直接签名(参见JavaScript 客户端签名直传 )时,AccessKeyID 和 AcessKeySecret 会暴露在前端页面,因此存在严重的安全隐患。因此,OSS 提供了服务端签名后直传的方案。
原理介绍
服务端签名后直传的原理如下:
用户发送上传 Policy 请求到应用服务器。 应用服务器返回上传 Policy 和签名给用户。 用户直接上传数据到 OSS。 编写“io.niceseason.gulimall.thirdparty.controller.OssController”类:
1 2 3 4 5 6 7 8 9 10 11 12 13 14 15 16 17 18 19 20 21 22 23 24 25 26 27 28 29 30 31 32 33 34 35 36 37 38 39 40 41 42 43 44 45 46 47 48 49 50 51 52 53 54 55 56 57 58 59 60 61 62 63 64 65 66 67 68 69 70 package io.niceseason.gulimall.thirdparty.controller;import com.aliyun.oss.OSS;import com.aliyun.oss.common.utils.BinaryUtil;import com.aliyun.oss.model.MatchMode;import com.aliyun.oss.model.PolicyConditions;import org.springframework.beans.factory.annotation.Autowired;import org.springframework.beans.factory.annotation.Value;import org.springframework.web.bind.annotation.RequestMapping;import org.springframework.web.bind.annotation.RestController;import java.text.SimpleDateFormat;import java.util.Date;import java.util.LinkedHashMap;import java.util.Map;@RestController public class OssController { @Autowired OSS ossClient; @Value ("${spring.cloud.alicloud.oss.endpoint}" ) String endpoint ; @Value("${spring.cloud.alicloud.oss.bucket}") String bucket ; @Value("${spring.cloud.alicloud.access-key}") String accessId ; @Value("${spring.cloud.alicloud.secret-key}") String accessKey ; @RequestMapping("/oss/policy") public Map<String, String> policy () { String host = "https://" + bucket + "." + endpoint; String format = new SimpleDateFormat ("yyyy-MM-dd" ).format(new Date ()); String dir = format; Map<String, String> respMap=null ; try { long expireTime = 30 ; long expireEndTime = System.currentTimeMillis() + expireTime * 1000 ; Date expiration = new Date (expireEndTime); PolicyConditions policyConds = new PolicyConditions (); policyConds.addConditionItem(PolicyConditions.COND_CONTENT_LENGTH_RANGE, 0 , 1048576000 ); policyConds.addConditionItem(MatchMode.StartWith, PolicyConditions.COND_KEY, dir); String postPolicy = ossClient.generatePostPolicy(expiration, policyConds); byte [] binaryData = postPolicy.getBytes("utf-8" ); String encodedPolicy = BinaryUtil.toBase64String(binaryData); String postSignature = ossClient.calculatePostSignature(postPolicy); respMap= new LinkedHashMap <String, String>(); respMap.put("accessid" , accessId); respMap.put("policy" , encodedPolicy); respMap.put("signature" , postSignature); respMap.put("dir" , dir); respMap.put("host" , host); respMap.put("expire" , String.valueOf(expireEndTime / 1000 )); } catch (Exception e) { System.out.println(e.getMessage()); } finally { ossClient.shutdown(); } return respMap; } }
测试: http://localhost:30000/oss/policy
1 2 3 4 5 6 7 8 { "accessid" : "LTAI4GCo3GXSVxHd4aSSCN4B" , "policy" : "eyJleHBpcmF0aW9uIjoiMjAyMS0wNS0wMVQxMTowMToxMC43MTlaIiwiY29uZGl0aW9ucyI6W1siY29udGVudC1sZW5ndGgtcmFuZ2UiLDAsMTA0ODU3NjAwMF0sWyJzdGFydHMtd2l0aCIsIiRrZXkiLCIyMDIxLTA1LTAxIl1dfQ==" , "signature" : "g/d52Kq2s5k7mmmN1SwEgfBsC8c=" , "dir" : "2021-05-01" , "host" : "https://oy-gulimall.oss-cn-shenzhen.aliyuncs.com" , "expire" : "1619866870" }
以后在上传文件时的访问路径为“ http://localhost:88/api/thirdparty/oss/policy”,
在“gulimall-gateway”中配置路由规则:
1 2 3 4 5 6 - id: third_party_route uri: lb://gulimall-third-party predicates: - Path=/api/thirdparty/** filters: - RewritePath=/api/thirdparty/(?<segment>/?.*),/$\{segment}
测试是否能够正常跳转: http://localhost:88/api/thirdparty/oss/policy
上传组件 放置项目提供的 upload 文件夹到 components/目录下,一个是单文件上传,另外一个是多文件上传
1 gulimall\renren-fast-vue\src\components\upload
要修改 vue 项目中心品牌 logo 地址,要改成下面形式:
brand-add-or-update.vue 中
修改 el-form-item label=”品牌 logo 地址”内容。 要使用文件上传组件,先导入 import SingleUpload from “@/components/upload/singleUpload”; 填入<single-upload v-model="dataForm.logo"></single-upload> 写明要使用的组件, 点击一下文件上传,发现发送了两个请求
localhost:88/api/thirdparty/oss/policy?t=1613300654238
注: 特立独行ベ猫 的 vue 前端,他 policy.js 中多写了一个/,导致 404,去掉就好了
正确形式:localhost:88/api/thirdparty/oss/policy?t=1613300654238
我们在后端准备好了签名 controller,那么前端是在哪里获取的呢
policy.js
逻辑为先去访问我们的服务器获取 policy,然后取阿里云,所以我们至少要发送 2 个请求
1 2 3 4 5 6 7 8 9 10 11 12 13 import http from "@/utils/httpRequest.js" ;export function policy ( return new Promise ((resolve, reject ) => { http ({ url : http.adornUrl ("/third/party/oss/policy" ), method : "get" , params : http.adornParams ({}), }).then (({ data } ) => { resolve (data); }); }); }
而文件上传前调用的方法: :before-upload=”beforeUpload”
1 2 3 4 5 6 7 8 9 10 11 12 13 14 15 16 17 18 19 20 21 22 23 24 25 26 27 28 29 30 发现该方法返回了一个new Promise ,调用了policy (),该方法是policy.js 中的 import { policy } from "./policy" ;.... beforeUpload (file ) { let _self = this ; return new Promise ((resolve, reject ) => { policy () .then (response => _self.dataObj .policy = response.data .policy ; _self.dataObj .signature = response.data .signature ; _self.dataObj .ossaccessKeyId = response.data .accessid ; _self.dataObj .key = response.data .dir +getUUID ()+"_${filename}" ; _self.dataObj .dir = response.data .dir ; _self.dataObj .host = response.data .host ; resolve (true ); }) .catch (err => console .log ("出错了..." ,err) reject (false ); }); }); },
在 vue 中看是 response.data.policy,在控制台看 response.policy。所以去 java 里面改返回值为 R。return R.ok().put(“data”,respMap);
六、 JSR303 校验 问题引入:填写 form 时应该有前端校验,后端也应该有校验
@NotNull 等 步骤 1:使用校验注解
在 Java 中提供了一系列的校验方式,它这些校验方式在“javax.validation.constraints”包中,提供了如@Email,@NotNull 等注解。
1 2 3 4 5 6 <dependency > <groupId > org.springframework.boot</groupId > <artifactId > spring-boot-starter-validation</artifactId > </dependency > 里面依赖了hibernate-validator
在非空处理方式上提供了@NotNull,@NotBlank 和@NotEmpty
(1)@NotNull 该属性不能为 null
(2)@NotEmpty 该字段不能为 null 或""
支持以下几种类型
CharSequence (length of character sequence is evaluated)字符序列(字符序列长度的计算) Collection (collection size is evaluated) 集合长度的计算 Map (map size is evaluated) map 长度的计算 Array (array length is evaluated) 数组长度的计算 上面什么意思呢?就是说如果标注的是 map,它会帮你看长度 (3)@NotBlank:不能为空,不能仅为一个空格
@Valid 内置异常 步骤 2:在请求方法种,使用校验注解@Valid,开启校验,
这里内置异常的意思是发生异常时返回的 json 不是我们的 R 对象,而是 mvc 的内置类
1 2 3 4 5 6 @RequestMapping("/save") public R save (@Valid @RequestBody BrandEntity brand) { brandService.save(brand); return R.ok(); }
测试: http://localhost:88/api/product/brand/save
在 postman 种发送上面的请求
1 2 3 4 5 6 7 8 9 10 11 12 13 14 15 16 17 18 19 20 21 22 23 24 25 26 27 28 29 30 31 { "timestamp" : "2020-04-29T09:20:46.383+0000" , "status" : 400 , "error" : "Bad Request" , "errors" : [ { "codes" : [ "NotBlank.brandEntity.name" , "NotBlank.name" , "NotBlank.java.lang.String" , "NotBlank" ] , "arguments" : [ { "codes" : [ "brandEntity.name" , "name" ] , "arguments" : null , "defaultMessage" : "name" , "code" : "name" } ] , "defaultMessage" : "不能为空" , "objectName" : "brandEntity" , "field" : "name" , "rejectedValue" : "" , "bindingFailure" : false , "code" : "NotBlank" } ] , "message" : "Validation failed for object='brandEntity'. Error count: 1" , "path" : "/product/brand/save" }
能够看到”defaultMessage”: “不能为空”,这些错误消息定义在“hibernate-validator”的“\org\hibernate\validator\ValidationMessages_zh_CN.properties”文件中。在该文件中定义了很多的错误规则:
1 2 3 4 5 6 7 8 9 10 11 12 13 14 15 16 17 18 19 20 21 22 23 24 25 26 27 28 29 30 31 32 33 34 35 36 37 38 39 40 41 42 43 44 javax.validation.constraints.AssertFalse.message = 只能为false javax.validation.constraints.AssertTrue.message = 只能为true javax.validation.constraints.DecimalMax.message = 必须小于或等于{value} javax.validation.constraints.DecimalMin.message = 必须大于或等于{value} javax.validation.constraints.Digits.message = 数字的值超出了允许范围(只允许在{integer}位整数和{fraction}位小数范围内) javax.validation.constraints.Email.message = 不是一个合法的电子邮件地址 javax.validation.constraints.Future.message = 需要是一个将来的时间 javax.validation.constraints.FutureOrPresent.message = 需要是一个将来或现在的时间 javax.validation.constraints.Max.message = 最大不能超过{value} javax.validation.constraints.Min.message = 最小不能小于{value} javax.validation.constraints.Negative.message = 必须是负数 javax.validation.constraints.NegativeOrZero.message = 必须是负数或零 javax.validation.constraints.NotBlank.message = 不能为空 javax.validation.constraints.NotEmpty.message = 不能为空 javax.validation.constraints.NotNull.message = 不能为null javax.validation.constraints.Null.message = 必须为null javax.validation.constraints.Past.message = 需要是一个过去的时间 javax.validation.constraints.PastOrPresent.message = 需要是一个过去或现在的时间 javax.validation.constraints.Pattern.message = 需要匹配正则表达式"{regexp}" javax.validation.constraints.Positive.message = 必须是正数 javax.validation.constraints.PositiveOrZero.message = 必须是正数或零 javax.validation.constraints.Size.message = 个数必须在{min}和{max}之间 org.hibernate.validator.constraints.CreditCardNumber.message = 不合法的信用卡号码 org.hibernate.validator.constraints.Currency.message = 不合法的货币 (必须是{value}其中之一) org.hibernate.validator.constraints.EAN.message = 不合法的{type}条形码 org.hibernate.validator.constraints.Email.message = 不是一个合法的电子邮件地址 org.hibernate.validator.constraints.Length.message = 长度需要在{min}和{max}之间 org.hibernate.validator.constraints.CodePointLength.message = 长度需要在{min}和{max}之间 org.hibernate.validator.constraints.LuhnCheck.message = ${validatedValue}的校验码不合法, Luhn模10校验和不匹配 org.hibernate.validator.constraints.Mod10Check.message = ${validatedValue}的校验码不合法, 模10校验和不匹配 org.hibernate.validator.constraints.Mod11Check.message = ${validatedValue}的校验码不合法, 模11校验和不匹配 org.hibernate.validator.constraints.ModCheck.message = ${validatedValue}的校验码不合法, ${modType}校验和不匹配 org.hibernate.validator.constraints.NotBlank.message = 不能为空 org.hibernate.validator.constraints.NotEmpty.message = 不能为空 org.hibernate.validator.constraints.ParametersScriptAssert.message = 执行脚本表达式"{script}"没有返回期望结果 org.hibernate.validator.constraints.Range.message = 需要在{min}和{max}之间 org.hibernate.validator.constraints.SafeHtml.message = 可能有不安全的HTML内容 org.hibernate.validator.constraints.ScriptAssert.message = 执行脚本表达式"{script}"没有返回期望结果 org.hibernate.validator.constraints.URL.message = 需要是一个合法的URL org.hibernate.validator.constraints.time.DurationMax.message = 必须小于${inclusive == true ? '或等于' : ''}${days == 0 ? '' : days += '天'}${hours == 0 ? '' : hours += '小时'}${minutes == 0 ? '' : minutes += '分钟'}${seconds == 0 ? '' : seconds += '秒'}${millis == 0 ? '' : millis += '毫秒'}${nanos == 0 ? '' : nanos += '纳秒'} org.hibernate.validator.constraints.time.DurationMin.message = 必须大于${inclusive == true ? '或等于' : ''}${days == 0 ? '' : days += '天'}${hours == 0 ? '' : hours += '小时'}${minutes == 0 ? '' : minutes += '分钟'}${seconds == 0 ? '' : seconds += '秒'}${millis == 0 ? '' : millis += '毫秒'}${nanos == 0 ? '' : nanos += '纳秒'}
想要自定义错误消息,可以覆盖默认的错误提示信息,如@NotBlank 的默认 message 是
1 2 3 public @interface NotBlank { String message () default "{javax.validation.constraints.NotBlank.message}" ;
可以在添加注解的时候,修改 message:
1 2 @NotBlank(message = "品牌名必须非空") private String name;
当再次发送请求时,得到的错误提示信息:
1 2 3 4 5 6 7 8 9 10 11 12 13 14 15 16 17 18 19 20 21 22 23 24 25 26 27 28 29 30 31 { "timestamp" : "2020-04-29T09:36:04.125+0000" , "status" : 400 , "error" : "Bad Request" , "errors" : [ { "codes" : [ "NotBlank.brandEntity.name" , "NotBlank.name" , "NotBlank.java.lang.String" , "NotBlank" ] , "arguments" : [ { "codes" : [ "brandEntity.name" , "name" ] , "arguments" : null , "defaultMessage" : "name" , "code" : "name" } ] , "defaultMessage" : "品牌名必须非空" , "objectName" : "brandEntity" , "field" : "name" , "rejectedValue" : "" , "bindingFailure" : false , "code" : "NotBlank" } ] , "message" : "Validation failed for object='brandEntity'. Error count: 1" , "path" : "/product/brand/save" }
但是这种返回的错误结果并不符合我们的业务需要。
局部异常处理 BindResult 步骤 3:给校验的 Bean 后,紧跟一个 BindResult,就可以获取到校验的结果。拿到校验的结果,就可以自定义的封装。
如下两个方法是一体的
1 2 3 4 5 6 7 8 9 10 11 12 13 14 15 16 17 18 19 20 21 @RequestMapping("/save") public R save (@Valid @RequestBody BrandEntity brand, BindingResult result) { if ( result.hasErrors()){ Map<String,String> map=new HashMap <>(); result.getFieldErrors().forEach((item)->{ String message = item.getDefaultMessage(); String field = item.getField(); map.put(field,message); }); return R.error(400 ,"提交的数据不合法" ).put("data" ,map); }else { } brandService.save(brand); return R.ok(); }
这种是针对于该请求设置了一个内容校验,如果针对于每个请求都单独进行配置,显然不是太合适,实际上可以统一的对于异常进行处理。
统一异常处理@ExceptionHandler 上文说到 @ ExceptionHandler 需要进行异常处理的方法必须与出错的方法在同一个 Controller 里面。那么当代码加入了 @ControllerAdvice,则不需要必须在同一个 controller 中了。这也是 Spring 3.2 带来的新特性。从名字上可以看出大体意思是控制器增强。 也就是说,@controlleradvice + @ ExceptionHandler 也可以实现全局的异常捕捉。
可以使用 SpringMvc 所提供的@ControllerAdvice,通过“basePackages”能够说明处理哪些路径下的异常。
(1)抽取一个异常处理类
@ControllerAdvice标注在类上,通过“basePackages”能够说明处理哪些路径下的异常。@ExceptionHandler(value = 异常类型.class) 标注在方法上1 2 3 4 5 6 7 8 9 10 11 12 13 14 15 16 17 18 19 20 21 22 23 24 25 26 27 28 29 30 31 32 33 34 35 36 37 38 package io.niceseason.gulimall.product.exception;import io.niceseason.common.utils.R;import lombok.extern.slf4j.Slf4j;import org.springframework.validation.BindingResult;import org.springframework.web.bind.MethodArgumentNotValidException;import org.springframework.web.bind.annotation.ControllerAdvice;import org.springframework.web.bind.annotation.ExceptionHandler;import org.springframework.web.bind.annotation.ResponseBody;import org.springframework.web.bind.annotation.RestControllerAdvice;import java.util.HashMap;import java.util.Map;@Slf4j @RestControllerAdvice(basePackages = "io.niceseason.gulimall.product.controller") public class GulimallExceptionAdvice { @ExceptionHandler(value = Exception.class) public R handleValidException (MethodArgumentNotValidException exception) { Map<String,String> map=new HashMap <>(); BindingResult bindingResult = exception.getBindingResult(); bindingResult.getFieldErrors().forEach(fieldError -> { String message = fieldError.getDefaultMessage(); String field = fieldError.getField(); map.put(field,message); }); log.error("数据校验出现问题{},异常类型{}" ,exception.getMessage(),exception.getClass()); return R.error(400 ,"数据校验出现问题" ).put("data" ,map); } }
(2)测试: http://localhost:88/api/product/brand/save
(3)默认异常处理 1 2 3 4 5 @ExceptionHandler(value = Throwable.class) public R handleException (Throwable throwable) { log.error("未知异常{},异常类型{}" ,throwable.getMessage(),throwable.getClass()); return R.error(BizCodeEnum.UNKNOW_EXEPTION.getCode(),BizCodeEnum.UNKNOW_EXEPTION.getMsg()); }
(4)错误状态码 上面代码中,针对于错误状态码,是我们进行随意定义的,然而正规开发过程中,错误状态码有着严格的定义规则,如该在项目中我们的错误状态码定义
为了定义这些错误状态码,我们可以单独定义一个常量类,用来存储这些错误状态码
1 2 3 4 5 6 7 8 9 10 11 12 13 14 15 16 17 18 19 20 21 22 23 24 25 26 27 28 29 30 31 32 33 34 35 36 37 38 package io.niceseason.common.exception;public enum BizCodeEnum { UNKNOW_EXEPTION(10000 ,"系统未知异常" ), VALID_EXCEPTION( 10001 ,"参数格式校验失败" ); private int code; private String msg; BizCodeEnum(int code, String msg) { this .code = code; this .msg = msg; } public int getCode () { return code; } public String getMsg () { return msg; } }
(5)测试: http://localhost:88/api/product/brand/save
七、分组校验功能(完成多场景的复杂校验) 前面解决了统一异常处理,但是现状有新的需求是对同一实体类参数也要区分场景
如果新增和修改两个接口需要验证的字段不同,比如 id 字段,新增可以不传递,但是修改必须传递 id,我们又不可能写两个 vo 来满足不同的校验规则。所以就需要用到分组校验来实现。
步骤:
创建分组接口 Insert.class Update.class 在 VO 的属性中标注@NotBlank 等注解,并指定要使用的分组,如@NotNull(message = "用户姓名不能为空",groups = {Insert.class,Update.class}) controller 的方法上或者方法参数上写要处理的分组的接口信息,如@Validated(AddGroup.class) 1、@NotNull(groups={A.class}) 1、给校验注解,标注上 groups,指定什么情况下才需要进行校验
如:指定在更新和添加的时候,都需要进行校验
1 2 3 4 5 6 7 8 9 10 11 12 13 @NotNull(message = "修改必须定制品牌id", groups = {UpdateGroup.class}) @Null(message = "新增不能指定id", groups = {AddGroup.class}) @TableId private Long brandId;@NotBlank(groups = {AddGroup.class}) @URL(message = "logo必须是一个合法的URL地址", groups={AddGroup.class, UpdateGroup.class}) private String logo;注意上面因为@NotBlank 没有指定UpdateGroup分组,所以不生效。此时update时可以不携带,但带了一定得是url地址
在这种情况下,没有指定分组的校验注解,默认是不起作用的。想要起作用就必须要加 groups。
2、@Validated 业务方法参数上使用@Validated 注解
@Validated 的 value 值指定要使用的一个或多个分组
JSR-303 defines validation groups as custom annotations which an application declares for the sole purpose of using
JSR-303 将验证组定义为自定义注释,应用程序声明的唯一目的是将它们用作类型安全组参数,如 SpringValidatorAdapter 中实现的那样。
Other SmartValidator implementations may support class arguments in other ways as well.
其他 SmartValidator 实现也可以以其他方式支持类参数。
1 2 3 4 5 6 7 8 9 10 11 12 13 14 15 @RequestMapping("/save") public R save (@Validated(AddGroup.class) @RequestBody BrandEntity brand) { brandService.save(brand); return R.ok(); } @RequestMapping("/delete") public R delete (@RequestBody Long[] brandIds) { brandService.removeByIds(Arrays.asList(brandIds)); return R.ok(); }
总结:controller 接收到之后,根据@Validated 表明的分组信息,品牌对应的校验注解。
3、分组校验的默认校验 这里要是指定了分组,实体类上的注解就是指定了分组的注解才生效,
没有指定分组的默认不生效,要是没有指定分组,就是对没有指定分组的注解生效,指定分组的注解就不生效了
可以在自定义的异常分组接口中继承Default类。所有没有写明 group 的都属于 Default 分组。
此外还可以在实体类上标注@GroupSequece({A.class,B.class})指定校验顺序
通过@GroupSequence 指定验证顺序:先验证 A 分组,如果有错误立即返回而不会验证 B 分组,接着如果 A 分组验证通过了,那么才去验证 B 分组,最后指定 User.class 表示那些没有分组的在最后。这样我们就可以实现按顺序验证分组了。
关于 Default,此处我 springvalidation 默认生成的验证接口,验证的范围是所有带有验证信息的属性,
若是属性上方写了验证组,则是验证该组内的属性
若是验证实体类类上写了 GroupSequence({}) 则说明重写了 Default 验证接口,Default 就按照 GroupSequence 里所写的组信息进行验证
八、自定义校验功能 Hibernate Validator 提供了一系列内置的校验注解,可以满足大部分的校验需求。但是,仍然有一部分校验需要特殊定制,例如某个字段的校验,我们提供两种校验强度,当为normal强度时我们除了<>号之外 ,都允许出现。当为strong强度时,我们只允许出现常用汉字,数字,字母 。内置的注解对此则无能为力,我们试着通过自定义校验来解决这个问题。
场景:要校验showStatus的 0/1 状态,可以用正则,但我们可以利用其他方式解决复杂场景。比如我们想要下面的场景
1 2 3 4 5 6 @NotNull(groups = {AddGroup.class, UpdateStatusGroup.class}) @ListValue(vals = {0,1}, groups = {AddGroup.class, UpdateGroup.class, UpdateStatusGroup.class}) private Integer showStatus;
添加依赖
1 2 3 4 5 6 7 8 9 10 11 12 13 14 15 16 17 <dependency > <groupId > javax.validation</groupId > <artifactId > validation-api</artifactId > <version > 2.1.0.Final</version > </dependency > <dependency > <groupId > org.hibernate</groupId > <artifactId > hibernate-validator</artifactId > <version > 5.4.1.Final</version > </dependency > <dependency > <groupId > org.glassfish</groupId > <artifactId > javax.el</artifactId > <version > 3.0.1-b08</version > </dependency >
1、编写一个自定义的校验注解 必须有 3 个属性
message()错误信息 groups()分组校验 payload()自定义负载信息 1 2 3 4 5 6 7 8 9 10 11 12 13 14 @Documented @Constraint(validatedBy = { ListValueConstraintValidator.class}) @Target({ METHOD, FIELD, ANNOTATION_TYPE, CONSTRUCTOR, PARAMETER, TYPE_USE }) @Retention(RUNTIME) public @interface ListValue { String message () default "{io.niceseason.common.valid.ListValue.message}" ; Class<?>[] groups() default { }; Class<? extends Payload >[] payload() default { }; int [] value() default {}; }
因为上面的 message 值对应的最终字符串需要去 ValidationMessages.properties 中获得,所以我们在 common 中新建文件ValidationMessages.properties
文件内容
1 com.atguigu.common.valid.ListValue.message =必须提交指定的值 [0,1]
2、编写一个自定义的校验器 上面只是定义了异常消息,但是怎么验证是否异常还没说,下面的 ConstraintValidator 就是说的
比如我们要限定某个属性值必须在一个给定的集合里,那么就通过重写 initialize()方法,指定可以有哪些元素。
而 controller 接收到的数据用 isValid(验证
1 2 3 4 5 6 7 8 9 10 11 12 13 14 15 16 17 18 19 20 public class ListValueConstraintValidator implements ConstraintValidator <ListValue,Integer> { private Set<Integer> set=new HashSet <>(); @Override public void initialize (ListValue constraintAnnotation) { int [] value = constraintAnnotation.value(); for (int i : value) { set.add(i); } } @Override public boolean isValid (Integer value, ConstraintValidatorContext context) { return set.contains(value); } }
具体的校验类需要实现ConstraintValidator接口,第一个泛型参数是所对应的校验注解类型,第二个是校验对象类型。在初始化方法initialize中,我们可以先做一些别的初始化工作,例如这里我们获取到注解上的 value 并保存下来,然后生成 set 对象。
真正的验证逻辑由isValid完成,如果传入形参的属性值在这个 set 里就返回 true,否则返回 false
3、关联自定义的校验器和自定义的校验注解 1 @Constraint(validatedBy = { ListValueConstraintValidator.class})
一个校验注解可以匹配多个校验器
4、使用实例 1 2 3 4 5 @ListValue(value = {0,1},groups ={AddGroup.class}) private Integer showStatus;
如验证手机号格式,可以参考https://blog.csdn.net/GAMEloft9/article/details/81699500
九、商品 SPU 和 SKU 管理 重新执行“sys_menus.sql”
SPU:standard product unit(标准化产品单元):是商品信息聚合的最小单位,是一组可复用、易检索的标准化信息的集合,该集合描述了一个产品的特性。
SKU:stock keeping unit(库存量单位):库存进出计量的基本单元,可以是件/盒/托盘等单位。SKU 是对于大型连锁超市 DC 配送中心物流管理的一个必要的方法。现在已经被引申为产品统一编号的简称,每种产品对应有唯一的 SKU 号。
基础属性:同一个 SPU 拥有的特性叫基本属性 。如机身长度,这个是手机共用的属性。而每款手机的属性值不同
销售属性:能决定库存量的叫销售属性 。如颜色
3、基本属性〖规格参数〗与销售属性
属性是以三级分类组织起来的 规格参数中有些是可以提供检索的 规格参数 也是基本属性 ,他们具有自己的分组属性的分组也是以三级分类组织起来的 属性名确定的,但是值是每一个商品不同来决定的 ==pms 数据库表== pms 数据库下的 attr 属性表,attr-group 表
attr-group-id:几号分组 catelog-id:什么类别下的,比如手机 根据商品找到 spu-id,attr-id
属性关系-规格参数-销售属性-三级分类 关联关系
每个分类有特点的属性
先通过分类找打对应的数学分组,然后根据属性分组查到拥有的数学
SPU-SKU 属性表
荣耀 V20 有两个属性,网络和像素,但是这两个属性的 spu 是同一个,代表是同款手机。
sku 表里保存 spu 是同一手机,sku 可能相同可能不同,相同代表是同一款,不同代表是不同款。
属性表说明每个属性的 枚举值
分类表有所有的分类,但有父子关系
十、品牌管理和关联分类 点击子组件,父组件触发事件
前端代码不自己编写了,复制/代码/前端/modules/文件夹里面的内容复制到 vs 中
如果左侧显示没有视频全,是因为没有执行 sys_menus.sql
接口文档地址 https://easydoc.xyz/s/78237135
1、属性分组 后台:商品系统/平台属性/属性分组
现在想要实现点击菜单的左边,能够实现在右边展示数据
现在想要实现点击菜单的左边,能够实现在右边展示数据
根据其他的请求地址 http://localhost:8001/#/product-attrgroup
所以应该有 product/attrgroup.vue。我们之前写过 product/cateory.vue,现在我们要抽象到 common/cateory.vue(也就是左侧的 tree 单独成一个 vue 组件)
1)左侧内容:
要在左面显示菜单,右面显示表格。复制<el-row :gutter="20">。。。,放到 attrgroup.vue 的<template>。20 表示列间距
去 element-ui 文档里找到布局,
1 2 3 4 <el-row :gutter="20"> <el-col :span="6"> <div class="grid-content bg-purple"></div></el-col> <el-col :span="18"><div class="grid-content bg-purple"></div></el-col> </el-row>
分为 2 个模块,分别占 6 列和 18 列(分别是 tree 和当前 spu 等信息)
有了布局之后,要在里面放内容。接下来要抽象一个分类 vue。新建 common/category,生成 vue 模板。把之前写的 2-tree 放到<template>
1 2 3 4 5 6 7 8 9 10 <el-tree :data="menus" :props="defaultProps" node-key="catId" ref="menuTree" @node-click="nodeClick" ></el-tree> 所以他把menus绑定到了菜单上, 所以我们应该在export default {中有menus的信息 该具体信息会随着点击等事件的发生会改变值(或比如created生命周期时), tree也就同步变化了
common/category 写好后,就可以在 attrgroup.vue 中导入使用了
1 2 3 4 5 <script> import Category from "../common/category"; export default { //import引入的组件需要注入到对象中才能使用。组件名:自定义的名字,一致可以省略 components: { Category},
导入了之后,就可以在attrgroup.vue中找合适位置放好
1 2 3 4 5 6 <template> <el-row :gutter="20"> <el-col :span="6"> <category @tree-node-click="treenodeclick"></category> </el-col ></el-row> </template>
2)右侧表格内容:
开始填写属性分组页面右侧的表格
复制 gulimall-product\src\main\resources\src\views\modules\product\attrgroup.vue 中的部分内容 div 到attrgroup.vue
批量删除是弹窗 add-or-update
导入 data、结合 components
2、父子组件传递数据 要实现功能:点击左侧,右侧表格对应内容显示。
父子组件传递数据:category.vue 点击时,引用它的 attgroup.vue 能感知到, 然后通知到 add-or-update
比如嵌套 div,里层 div 有事件后冒泡到外层 div(是指一次点击调用了两个 div 的点击函数)
1)子组件给父组件传递数据,事件机制;
在 category 中绑定 node-click 事件,
1 2 3 4 5 6 7 <el-tree :data="menus" :props="defaultProps" node-key="catId" ref="menuTree" @node-click="nodeClick" ></el-tree>
3、this.$emit() 2)子组件给父组件发送一个事件,携带上数据;
1 2 3 4 nodeClick (data,Node,component ){ console .log ("子组件" ,data,Node ,component); this .$emit("tree-node-click" ,data,Node ,component); },
this.$emit(事件名,”携带的数据”);
3)父组件中的获取发送的事件
1 <category @tree-node-click="treeNodeClick"></category>
1 2 3 4 5 6 7 8 9 10 11 12 13 14 15 16 17 18 19 20 21 22 23 24 25 26 27 28 29 30 treenodeclick (data, node, component ) { if (node.level == 3 ) { this .catId = data.catId ; this .getDataList (); } }, getDataList ( this .dataListLoading = true ; this .$http({ url : this .$http .adornUrl (`/product/attrgroup/list/${this .catId} ` ), method : "get" , params : this .$http .adornParams ({ page : this .pageIndex , limit : this .pageSize , key : this .dataForm .key }) }).then (({ data } ) => { if (data && data.code === 0 ) { this .dataList = data.page .list ; this .totalPage = data.page .totalCount ; } else { this .dataList = []; this .totalPage = 0 ; } this .dataListLoading = false ; }); },
4)分组新增&级联选择器
由于三级分类的children属性为[],因此显示效果如上,为了避免这种效果,我们可以为该字段添加注解 @JsonInclude(JsonInclude.Include.NON_EMPTY),表示当只有该字段不为空时才会返回该属性。
1 2 @JsonInclude(JsonInclude.Include.NON_EMPTY) private List<CategoryEntity> children;
4)分组修改与回显
由于修改时所属分类不能正常回显,因为缺少完整的三级路径,因此我们在AttrGroupEntity中添加字段catelogPath,并使用递归查找
1 2 @TableField(exist = false) private Long[] catelogPath;
1 2 3 4 5 6 7 8 9 10 11 12 13 14 15 16 17 18 19 20 21 22 23 24 25 @RequestMapping("/info/{attrGroupId}") public R info (@PathVariable("attrGroupId") Long attrGroupId) { AttrGroupEntity attrGroup = attrGroupService.getById(attrGroupId); Long[] catelogPath=categoryService.findCatelogPathById(attrGroup.getCatelogId()); attrGroup.setCatelogPath(catelogPath); return R.ok().put("attrGroup" , attrGroup); } @Override public Long[] findCatelogPathById(Long categorygId) { List<Long> path = new LinkedList <>(); findPath(categorygId, path); Collections.reverse(path); Long[] objects = path.toArray(new Long [path.size()]); return objects; } private void findPath (Long categorygId, List<Long> path) { if (categorygId!=0 ){ path.add(categorygId); CategoryEntity byId = getById(categorygId); findPath(byId.getParentCid(),path); } }
优化:会话关闭时清空内容,防止下次开启还遗留数据
attrgroup-add-or-update.vue
4、分页插件 mp 常用注解 比如@TableName,标注在实体类上,使用的时候定义 mapper 接口指定实体类泛型即可
也可以使用@TableField 映射属性和数据库字段
@TableLogic 用于逻辑删除
wrapper 查询条件用 QueryWrapper 包装
wrapper.allEq(map);用于指定字段值
wrapper.gt(“age”,2);// 大于 // 用于指定字段与常数关系
1 2 3 4 5 6 7 QueryWrapper wrapper = new QueryWrapper ();wrapper.orderByDesc("age" ); wrapper.orderByAsc("age" ); wrapper.having("id > 8" ); mapper.selectList(wrapper).forEach(System.out::println); mapper.selectBatchIds(Arrays.asList(7 ,8 ,9 ));
mp 分页使用 1 2 3 4 5 6 7 8 9 10 11 12 13 14 15 16 17 @EnableTransactionManagement @Configuration @MapperScan("com.baomidou.cloud.service.*.mapper*") public class MybatisPlusConfig { @Bean public PaginationInterceptor paginationInterceptor () { PaginationInterceptor paginationInterceptor = new PaginationInterceptor (); paginationInterceptor.setCountSqlParser(new JsqlParserCountOptimize (true )); return paginationInterceptor; } }
参考 MyBatis-Plus 官网
接口IPage<User> selectPageVo(Page<?> page, Integer state); xml:不变 接收的返回值IPage<T> 1 2 3 Page page = new Page <>(2 ,2 );Page result = mapper.selectPage(page,null );result.getRecords()
如果要自定义 SQL,在接口里单独写@Select 注解或者在 xml 里写好即可
Query 在 Service 实现层 this.page(Page,QueryWrapper)
项目中用的分页方式,不是自己创建 page 对象,而是根据 url 的参数自动封装
1 2 3 4 5 6 7 8 9 10 11 12 13 14 15 16 17 18 19 20 21 22 23 24 25 26 27 28 29 30 31 32 33 34 35 36 37 38 39 40 41 42 43 44 45 46 47 48 49 50 51 52 53 54 55 56 57 58 59 60 61 62 63 64 65 66 67 package com.atguigu.common.utils;public class Query <T> { public IPage<T> getPage (Map<String, Object> params) { return this .getPage(params, null , false ); } public IPage<T> getPage (Map<String, Object> params, // 参数有curPage limit order sidx asc String defaultOrderField,// 默认排序字段 boolean isAsc) { long curPage = 1 ; long limit = 10 ; if (params.get(Constant.PAGE) != null ){ curPage = Long.parseLong((String)params.get(Constant.PAGE)); } if (params.get(Constant.LIMIT) != null ){ limit = Long.parseLong((String)params.get(Constant.LIMIT)); } Page<T> page = new Page <>(curPage, limit); params.put(Constant.PAGE, page); String orderField = SQLFilter.sqlInject((String)params.get(Constant.ORDER_FIELD)); String order = (String)params.get(Constant.ORDER); if (StringUtils.isNotEmpty(orderField) && StringUtils.isNotEmpty(order)){ if (Constant.ASC.equalsIgnoreCase(order)) { return page.addOrder(OrderItem.asc(orderField)); }else { return page.addOrder(OrderItem.desc(orderField)); } } if (StringUtils.isBlank(defaultOrderField)){ return page; } if (isAsc) { page.addOrder(OrderItem.asc(defaultOrderField)); }else { page.addOrder(OrderItem.desc(defaultOrderField)); } return page; } }
常规用法:XML 自定义分页 这种用法其实是 mybatis 的内容
1 2 3 4 5 6 7 8 public interface UserMapper { IPage<User> selectPageVo (Page<?> page, Integer state) ; }
UserMapper.xml 等同于编写一个普通 list 查询,mybatis-plus 自动替你分页 1 2 3 <select id ="selectPageVo" resultType ="com.baomidou.cloud.entity.UserVo" > SELECT id,name FROM user WHERE state=#{state} </select >
UserServiceImpl.java 调用分页方法 1 2 3 4 5 6 7 public IPage<User> selectUserPage (Page<User> page, Integer state) { return userMapper.selectPageVo(page, state); }
模糊查询 1 2 3 4 5 6 7 8 9 10 11 12 13 14 15 16 @Override public PageUtils queryPage (Map<String, Object> params) { QueryWrapper<BrandEntity> wrapper = new QueryWrapper <>(); String key = (String) params.get("key" ); if (!StringUtils.isEmpty(key)){ wrapper.eq("brand_id" , key).or().like("name" , key); } IPage<BrandEntity> page = this .page( new Query <BrandEntity>().getPage(params), wrapper ); return new PageUtils (page); }
Ipage 1 2 3 4 5 6 7 default <E extends IPage <T>> E page (E page, Wrapper<T> queryWrapper) { return this .getBaseMapper().selectPage(page, queryWrapper); }
5、关联分类 新增的华为、小米、oppo 都应该是手机下的品牌,但是品牌对分类可能是一对多的,比如小米对应手机和电视
多对多的关系应该有 relation 表
修改 CategoryBrandRelationController 的逻辑
API:https://easydoc.xyz/doc/75716633/ZUqEdvA4/SxysgcEF
根据品牌 id 查出关联所有信息
1 2 3 4 5 6 7 @RequestMapping("catelog/list") public R cateloglist (@RequestParam Long brandId) { QueryWrapper<CategoryBrandRelationEntity> queryWrapper = new QueryWrapper <>(); queryWrapper.eq("brand_id" , brandId); List<CategoryBrandRelationEntity> data = categoryBrandRelationService.list(queryWrapper); return R.ok().put("data" , data); }
新增关联
关联表的优化: 分类名本可以在 brand 表中,但因为关联查询对数据库性能有影响 ,在电商中大表数据从不做关联,哪怕分步查 也不用关联
所以像 name 这种冗余字段可以保存,优化 save,保存时用关联表存好,但 select 时不用关联
1 2 3 4 5 6 7 8 9 10 11 12 13 14 15 16 17 18 19 @RequestMapping("/save") public R save (@RequestBody CategoryBrandRelationEntity categoryBrandRelation) { categoryBrandRelationService.saveDetail(categoryBrandRelation); return R.ok(); } @Override public void saveDetail (CategoryBrandRelationEntity categoryBrandRelation) { Long brandId = categoryBrandRelation.getBrandId(); Long catelogId = categoryBrandRelation.getCatelogId(); BrandEntity brandEntity = brandDao.selectById(brandId); CategoryEntity categoryEntity = categoryDao.selectById(catelogId); categoryBrandRelation.setBrandName(brandEntity.getName()); categoryBrandRelation.setCatelogName(categoryEntity.getName()); this .save(categoryBrandRelation); }
最终效果:
保持冗余字段的数据一致 但是如果分类表里的 name 发送变化,那么品牌表里的分类 name 字段应该同步变化。
所以应该修改 brand-controller,使之 update 时检测分类表里的 name 进行同步
十一、 规格参数新增与 VO 规格参数新增时,请求的 URL:Request URL:
http://localhost:88/api/product/attr/base/list/0?t=1588731762158&page=1&limit=10&key=
当有新增字段时,我们往往会在 entity 实体类中新建一个字段,并标注数据库中不存在该字段,然而这种方式并不规范
比较规范的做法是,新建一个 vo 文件夹,将每种不同的对象,按照它的功能进行了划分。在 java 中,涉及到了这几种类型
Request URL: http://localhost:88/api/product/attr/save,现在的情况是,它在保存的时候,只是保存了 attr,并没有保存 attrgroup,为了解决这个问题,我们新建了一个 vo/AttrVo,在原 AttrEntity 基础上增加了 attrGroupId 字段,使得保存新增数据的时候,也保存了它们之间的关系。
1 2 3 4 @Data public class AttrVo extends AttrEntity { private Long attrGroupId; }
并且由于查询时显示了所属分类名和所属分组名,并且在修改时要回显其三级分类,所以我们要为返回时的属性定制 vo
1 2 3 4 5 6 7 8 9 10 11 @Data public class AttrRespVo extends AttrVo { private String catelogName; private String groupName; private Long[] catelogPath; }
通过” BeanUtils.copyProperties(attr,attrEntity);”能够实现在两个 Bean 之间拷贝数据,但是两个 Bean 的字段要相同
1 2 3 4 5 6 @Override public void saveAttr (AttrVo attr) { AttrEntity attrEntity = new AttrEntity (); BeanUtils.copyProperties(attr,attrEntity); this .save(attrEntity); }
问题:现在有两个查询,一个是查询部分,另外一个是查询全部,但是又必须这样来做吗?还是有必要的,但是可以在后台进行设计,两种查询是根据 catId 是否为零进行区分的。
十二、规格 参数与销售属性的增删改查 查询
可以通过在添加路径变量{attrType}同时用一个方法查询销售属性和规格参数
1 2 3 4 5 6 7 8 9 10 11 12 13 14 15 16 17 18 19 20 21 22 23 24 25 26 27 28 29 30 31 32 33 34 35 36 37 38 39 40 41 42 43 44 45 46 47 48 49 50 51 @RequestMapping("/{attrType}/list/{catelogId}") public R infoCatelog (@RequestParam Map<String, Object> params, @PathVariable("catelogId") long catelogId, @PathVariable("attrType") String attrType) { PageUtils page = attrService.queryPage(params,catelogId,attrType); return R.ok().put("page" , page); } @Transactional @Override public PageUtils queryPage (Map<String, Object> params, long catelogId,String attrType) { QueryWrapper<AttrEntity> attrEntityQueryWrapper = new QueryWrapper <AttrEntity>().eq("attr_type" ,"base" .equalsIgnoreCase(attrType)?1 :0 ); if (catelogId != 0 ) { attrEntityQueryWrapper.eq("catelog_id" , catelogId); } String key = (String) params.get("key" ); if (!StringUtils.isEmpty(key)) { attrEntityQueryWrapper.and((wrapper) -> wrapper.eq("attr_id" , key).or().like("attr_name" , key)); } IPage<AttrEntity> page = this .page( new Query <AttrEntity>().getPage(params), attrEntityQueryWrapper ); List<AttrEntity> records = page.getRecords(); List<AttrRespVo> collect = records.stream().map((entity) -> { AttrRespVo respVo = new AttrRespVo (); BeanUtils.copyProperties(entity, respVo); CategoryEntity categoryEntity = categoryDao.selectOne(new QueryWrapper <CategoryEntity>().eq("cat_id" , entity.getCatelogId())); respVo.setCatelogName(categoryEntity.getName()); if ("base" .equalsIgnoreCase(attrType)) { AttrAttrgroupRelationEntity attrAttrgroupRelationEntity = attrAttrgroupRelationDao.selectOne(new QueryWrapper <AttrAttrgroupRelationEntity>().eq("attr_id" , entity.getAttrId())); if (attrAttrgroupRelationEntity != null && attrAttrgroupRelationEntity.getAttrGroupId() != null ) { AttrGroupEntity attrGroupEntity = attrGroupDao.selectOne(new QueryWrapper <AttrGroupEntity>().eq("attr_group_id" , attrAttrgroupRelationEntity.getAttrGroupId())); respVo.setGroupName(attrGroupEntity.getAttrGroupName()); } } return respVo; }).collect(Collectors.toList()); PageUtils pageUtils = new PageUtils (page); pageUtils.setList(collect); return pageUtils; }
保存
使用AttrVo封装属性,如果AttrGroupId非空,则为规则参数,需要更新属性-分组表
1 2 3 4 5 6 7 8 9 10 11 12 13 14 15 16 17 18 19 20 21 @RequestMapping("/save") public R save (@RequestBody AttrVo attr) { attrService.saveAttr(attr); return R.ok(); } @Transactional @Override public void saveAttr (AttrVo attr) { AttrEntity attrEntity = new AttrEntity (); BeanUtils.copyProperties(attr,attrEntity); this .save(attrEntity); if (attr.getAttrGroupId() != null ) { AttrAttrgroupRelationEntity attrAttrgroupRelationEntity = new AttrAttrgroupRelationEntity (); attrAttrgroupRelationEntity.setAttrGroupId(attr.getAttrGroupId()); attrAttrgroupRelationEntity.setAttrId(attrEntity.getAttrId()); attrAttrgroupRelationDao.insert(attrAttrgroupRelationEntity); } }
修改
1 2 3 4 5 6 7 8 9 10 11 12 13 14 15 16 17 18 19 20 21 22 23 24 25 26 27 28 @RequestMapping("/update") public R update (@RequestBody AttrVo attr) { attrService.updateAttr(attr); return R.ok(); } @Override public void updateAttr (AttrVo attr) { AttrEntity entity = new AttrEntity (); BeanUtils.copyProperties(attr,entity); this .baseMapper.updateById(entity); if (attr.getAttrGroupId() != null ) { AttrAttrgroupRelationEntity attrAttrgroupRelationEntity = new AttrAttrgroupRelationEntity (); attrAttrgroupRelationEntity.setAttrId(attr.getAttrId()); attrAttrgroupRelationEntity.setAttrGroupId(attr.getAttrGroupId()); Integer c = attrAttrgroupRelationDao.selectCount(new QueryWrapper <AttrAttrgroupRelationEntity>().eq("attr_id" , attrAttrgroupRelationEntity.getAttrId())); if (c>0 ){ attrAttrgroupRelationDao.update(attrAttrgroupRelationEntity, new UpdateWrapper <AttrAttrgroupRelationEntity>().eq("attr_id" , attr.getAttrId())); }else { attrAttrgroupRelationDao.insert(attrAttrgroupRelationEntity); } } } }
修改回显时查询数据
1 2 3 4 5 6 7 8 9 10 11 12 13 14 15 16 17 18 19 20 21 22 23 24 25 26 27 28 29 30 @RequestMapping("/info/{attrId}") public R info (@PathVariable("attrId") Long attrId) { AttrRespVo respVo=attrService.getAttrInfo(attrId); return R.ok().put("attr" , respVo); } @Transactional @Override public AttrRespVo getAttrInfo (Long attrId) { AttrEntity attrEntity = this .baseMapper.selectById(attrId); AttrRespVo respVo = new AttrRespVo (); BeanUtils.copyProperties(attrEntity,respVo); AttrAttrgroupRelationEntity attrAttrgroupRelationEntity = attrAttrgroupRelationDao.selectOne(new QueryWrapper <AttrAttrgroupRelationEntity>().eq("attr_id" , attrEntity.getAttrId())); if (attrAttrgroupRelationEntity != null && attrAttrgroupRelationEntity.getAttrGroupId() != null ) { AttrGroupEntity attrGroupEntity = attrGroupDao.selectOne(new QueryWrapper <AttrGroupEntity>().eq("attr_group_id" , attrAttrgroupRelationEntity.getAttrGroupId())); respVo.setGroupName(attrGroupEntity.getAttrGroupName()); respVo.setAttrGroupId(attrGroupEntity.getAttrGroupId()); } CategoryEntity categoryEntity = categoryDao.selectOne(new QueryWrapper <CategoryEntity>().eq("cat_id" , attrEntity.getCatelogId())); respVo.setCatelogName(categoryEntity.getName()); Long[] catelogPathById = categoryService.findCatelogPathById(categoryEntity.getCatId()); respVo.setCatelogPath(catelogPathById); return respVo; }
细节优化 在品牌管理中修改了品牌名,同时也让关联的表也同时发生修改
1 2 3 4 5 6 7 8 9 10 11 @RequestMapping("/update") public R update (@Validated(UpdateGroup.class) @RequestBody BrandEntity brand) { brandService.updateDetail(brand); return R.ok(); }
1 2 3 4 5 6 7 8 9 10 11 12 @Override @Transactional public void updateDetail (BrandEntity brand) { this .updateById(brand); if (!StringUtils.isEmpty(brand.getName())){ CategoryBrandRelationService.updateBrand(brand.getBrandId(),brand.getName()); } }
CategoryBrandRelationServiceImpl.java 1 2 3 4 5 6 7 @Override public void updateBrand (Long brandId, String name) { CategoryBrandRelationEntity relationEntity = new CategoryBrandRelationEntity (); relationEntity.setBrandId(brandId); relationEntity.setBrandName(name); this .update(relationEntity,new UpdateWrapper <CategoryBrandRelationEntity>().eq("brand_id" ,brandId)); }
效果展示
十三、 查询分组关联属性和删除关联 1、获取属性分组的关联的所有属性 API:https://easydoc.xyz/doc/75716633/ZUqEdvA4/LnjzZHPj
发送请求:/product/attrgroup/{attrgroupId}/attr/relation
AttrGroupController.java 和 AttrServiceImpl.java 1 2 3 4 5 6 7 8 9 10 11 12 13 14 15 16 17 18 19 20 21 @GetMapping("/{attrgroupId}/attr/relation") public R attrRelation (@PathVariable("attrgroupId") Long attrgroupId) { List<AttrEntity> entities = attrService.getRelationAttr(attrgroupId); return R.ok().put("data" ,entities); } @Override public List<AttrEntity> getRelationAttr (Long attrgroupId) { List<AttrAttrgroupRelationEntity> entities = relationDao.selectList(new QueryWrapper <AttrAttrgroupRelationEntity>().eq("attr_group_id" , attrgroupId)); List<Long> attrIds = entities.stream().map((attr) -> { return attr.getAttrId(); }).collect(Collectors.toList()); if (attrIds == null || attrIds.size() == 0 ){ return null ; } Collection<AttrEntity> attrEntities = this .listByIds(attrIds); return (List<AttrEntity>) attrEntities; }
如何查找:既然给出了 attr_group_id,那么到中间表中查询出来所关联的 attr_id,然后得到最终的所有属性即可。
可能出现 null 值的问题
2、移除属性分组的关联的属性 创建 AttrGroupRelationVo 对象 1 2 3 4 5 6 7 8 @Data public class AttrGroupRelationVo { private Long attrId; private Long attrGroupId; }
1 2 3 4 5 6 7 8 9 10 11 @PostMapping("/attr/relation/delete") public R deleteRelation (@RequestBody AttrGroupRelationVo[] vos) { attrService.deleteRelation(vos); return R.ok(); }
1 2 3 4 5 6 7 8 9 10 @Override public void deleteRelation (AttrGroupRelationVo[] vos) { List<AttrAttrgroupRelationEntity> entities = Arrays.asList(vos).stream().map((item) -> { AttrAttrgroupRelationEntity relationEntity = new AttrAttrgroupRelationEntity (); BeanUtils.copyProperties(item, relationEntity); return relationEntity; }).collect(Collectors.toList()); relationDao.deleteBatchRelation(entities); }
AttrAttrgroupRelationDao.java 1 2 3 4 5 @Mapper public interface AttrAttrgroupRelationDao extends BaseMapper <AttrAttrgroupRelationEntity> { void deleteBatchRelation (@Param("entities") List<AttrAttrgroupRelationEntity> entities) ; }
AttrAttrgroupRelationDao.xml 1 2 3 4 5 6 7 <delete id ="deleteBatchRelation" > DELETE FROM `pms_attr_attrgroup_relation` WHERE <foreach collection ="entities" item ="item" separator =" OR " > (attr_id=#{item.attrId} AND attr_group_id=#{item.attrGroupId}) </foreach > </delete >
十四、 查询分组未关联的属性 /product/attrgroup/{attrgroupId}/noattr/relation
API:https://easydoc.xyz/doc/75716633/ZUqEdvA4/d3EezLdO
获取属性分组里面还没有关联的本分类里面的其他基本属性,方便添加新的关联
Request URL: http://localhost:88/api/product/attrgroup/1/noattr/relation?t=1588780783441&page=1&limit=10&key=
属性分组,对应于“pms_attr_group”表,每个分组下,需要查看到关联了哪些属性信息,销售属性不需要和分组进行关联,但是规格参数要和属性分组进行关联。
规格参数:对应于pms_attr表,attr_type=1,需要显示分组信息
销售属性:对应于 pms_attr`表,attr_type=0,不需要显示分组信息
分组 ID 为 9 的分组:Request URL: http://localhost:88/api/product/attrgroup/9/noattr/relation?t=1588822258669&page=1&limit=10&key=
对应的数据库字段
attr_group_id attr_group_name sort descript icon catelog_id
9 主体 1 型号 平台 wu 454
10 显卡 1 显存容量 wu 454
11 输入设备 1 鼠标 键盘 wu 454
12 主板 1 显卡类型 芯片组 wu 454
13 规格 1 尺寸 wu 454
查询 attrgroupId=9 的属性分组:
1 AttrGroupEntity attrGroupEntity = attrGroupDao.selectById(attrgroupId);
获取到分类信息:
1 Long catelogId = attrGroupEntity.getCatelogId();
目标:获取属性分组没有关联的其他属性
也就是获取 attrgroupId=9 的属性分组中,关联的分类 catelog_id =454 (台式机),其他基本属性
在该属性分组中,现在已经关联的属性:
本分类下,存在哪些基本属性?
没有关联的其他属性
已经关联的属性,这些属性是如何关联上的?
答:在创建规格参数的时候,已经设置了需要关联哪些属性分组。
想要知道还没有关联哪些,先查看关联了哪些,如何排除掉这些就是未关联的
在中间表中显示了属性和属性分组之间的关联关系,在属性表中显示了所有的属性,
先查询中间表,得到所有已经关联的属性的 id,然后再次查询属性表,排除掉已经建立关联的属性 ID,将剩下的属性 ID 和属性建立起关联关系
1 2 3 4 5 6 @GetMapping("/{attrgroupId}/noattr/relation") public R attrNoRelation (@PathVariable("attrgroupId") Long attrgroupId, @RequestParam Map<String,Object> params) { PageUtils page = attrService.getNoRelationAttr(params,attrgroupId); return R.ok().put("page" ,page); }
1 2 3 4 5 6 7 8 9 10 11 12 13 14 15 16 17 18 19 20 21 22 23 24 25 26 27 28 29 30 31 32 33 34 35 36 37 @Override public PageUtils getNoRelationAttr (Map<String, Object> params, Long attrgroupId) { AttrGroupEntity attrGroupEntity = attrGroupDao.selectById(attrgroupId); Long catelogId = attrGroupEntity.getCatelogId(); List<AttrGroupEntity> group = attrGroupDao.selectList(new QueryWrapper <AttrGroupEntity>().eq("catelog_id" , catelogId)); List<Long> collect = group.stream().map(item -> { return item.getAttrGroupId(); }).collect(Collectors.toList()); List<AttrAttrgroupRelationEntity> groupId = relationDao.selectList(new QueryWrapper <AttrAttrgroupRelationEntity>().in("attr_group_id" , collect)); List<Long> attrIds = groupId.stream().map(item -> { return item.getAttrId(); }).collect(Collectors.toList()); QueryWrapper<AttrEntity> wrapper = new QueryWrapper <AttrEntity>().eq("catelog_id" , catelogId).eq("attr_type" , ProductConstant.AttrEnum.ATTR_TYPE_BASE.getCode()); if (attrIds != null && attrIds.size()>0 ){ wrapper.notIn("attr_id" ,attrIds); } String key = (String) params.get("key" ); if (!StringUtils.isEmpty(key)){ wrapper.and((w) -> { w.eq("attr_id" ,key).or().like("attr_name" ,key); }); } IPage<AttrEntity> page = this .page(new Query <AttrEntity>().getPage(params), wrapper); PageUtils pageUtils = new PageUtils (page); return pageUtils; }
效果展示
十五、添加属性和分组的关联关系 请求类型:Request URL: http://localhost:88/api/product/attrgroup/attr/relation
请求方式:POST
请求数据:[{“attrId”:10,”attrGroupId”:9}]
API:https://easydoc.xyz/doc/75716633/ZUqEdvA4/VhgnaedC
响应数据:
1 2 3 4 { "msg" : "success" , "code" : 0 }
本质就是在中间表 pms_attr_attrgroup_relation 中,添加一条记录的过程
1 2 3 4 5 6 @PostMapping("/attr/relation") public R addRelation (@RequestBody List<AttrGroupRelationVo> vos) { relationService.saveBathch(vos); return R.ok(); }
AttrAttrgroupRelationServiceImpl.java 1 2 3 4 5 6 7 8 9 10 @Override public void saveBathch (List<AttrGroupRelationVo> vos) { List<AttrAttrgroupRelationEntity> collect = vos.stream().map(item -> { AttrAttrgroupRelationEntity relationEntity = new AttrAttrgroupRelationEntity (); BeanUtils.copyProperties(item, relationEntity); return relationEntity; }).collect(Collectors.toList()); this .saveBatch(collect); }
十六、发布商品 1、获取所有会员等级 API:https://easydoc.xyz/doc/75716633/ZUqEdvA4/jCFganpf
在“gulimall-gateway”中修改“”文件,添加对于 member 的路由
1 2 3 4 5 6 - id: gulimall-member uri: lb://gulimall-member predicates: - Path=/api/member/** filters: - RewritePath=/api/(?<segment>/?.*),/$\{segment}
在“gulimall-member”中,创建“bootstrap.properties”文件,内容如下:
2.2.X
1 2 3 4 5 6 7 8 spring.cloud.nacos.config.name =gulimall-member spring.cloud.nacos.config.server-addr =192.168.137.14:8848 spring.cloud.nacos.config.namespace =1198d1a7-e6e9-4176-bbbe-c8c5a30533e5 server.port =8000 spring.cloud.nacos.config.extension-configs[0].data-id =gulimall-member.yml spring.cloud.nacos.config.extension-configs[0].group =DEFAULT_GROUP spring.cloud.nacos.config.extension-configs[0].refresh =true
2.1.x
1 2 3 4 5 6 7 8 9 spring.application.name =gulimall-member spring.cloud.nacos.config.server-addr =127.0.0.1:8848 spring.cloud.nacos.config.namespace =1198d1a7-e6e9-4176-bbbe-c8c5a30533e5 server.port =8000 spring.cloud.nacos.config.ext-config[0].data-id =gulimall-member.yml spring.cloud.nacos.config.ext-config[0].group =DEFAULT_GROUP spring.cloud.nacos.config.ext-config[0].refresh =true
2、获取分类关联的品牌 API:https://easydoc.xyz/doc/75716633/ZUqEdvA4/HgVjlzWV
1 2 3 4 5 6 7 8 9 10 @Data public class BrandVo { private Long brandId; private String brandName; }
CategoryBrandRelationController.java 1 2 3 4 5 6 7 8 9 10 11 12 13 @GetMapping("/brands/list") public R relationBrandsList (@RequestParam(value = "catId",required = true) Long catId) { List<BrandEntity> vos = categoryBrandRelationService.getBrandByCatId(catId); List<BrandVo> collect = vos.stream().map(item -> { BrandVo brandVo = new BrandVo (); brandVo.setBrandId(item.getBrandId()); brandVo.setBrandName(item.getName()); return brandVo; }).collect(Collectors.toList()); return R.ok().put("data" ,collect); }
CategoryBrandRelationServiceImpl.java 1 2 3 4 5 6 7 8 9 10 11 12 13 14 15 16 @Autowired CategoryBrandRelationDao relationDao; @Autowired BrandService brandService; @Override public List<BrandEntity> getBrandByCatId (Long catId) { List<CategoryBrandRelationEntity> catelogId = relationDao.selectList(new QueryWrapper <CategoryBrandRelationEntity>().eq("catelog_id" , catId)); List<BrandEntity> collect = catelogId.stream().map(item -> { Long brandId = item.getBrandId(); BrandEntity byId = brandService.getById(brandId); return byId; }).collect(Collectors.toList()); return collect; }
遇到 PubSub 问题
分类变化后请求没有被监听无法发送查询品牌信息的请求
首先安装 pubsub-js 1 `npm install --save pubsub-js`
订阅方组件
在 src 下的 main.js 中引用:
1 2 import PubSub from "pubsub-js" ;Vue .prototype PubSub = PubSub ;
3、获取分类下所有分组&关联属性 请求类型:/product/attrgroup/{catelogId}/withattr
请求方式:GET
请求 URL:http://localhost:88/api/product/attrgroup/225/withattr?t=1588864569478
AttrGroupWithAttrsVo.java 1 2 3 4 5 6 7 8 9 10 11 12 13 14 15 16 17 18 19 20 21 22 23 24 25 26 27 28 29 30 @Data public class AttrGroupWithAttrsVo { private Long attrGroupId; private String attrGroupName; private Integer sort; private String descript; private String icon; private Long catelogId; private List<AttrEntity> attrs; }
1 2 3 4 5 6 7 8 @GetMapping("/{catelogId}/withattr") public R getAttrGroupWithAttrs (@PathVariable("catelogId") Long catelogId) { List<AttrGroupWithAttrsVo> vos = attrGroupService.getAttrGroupWithAttrByCatelogId(catelogId); return R.ok().put("data" ,vos); }
AttrGroupServiceImpl.java 1 2 3 4 5 6 7 8 9 10 11 12 13 14 15 @Override public List<AttrGroupWithAttrsVo> getAttrGroupWithAttrByCatelogId (Long catelogId) { List<AttrGroupEntity> attrGroupEntityList = this .list(new QueryWrapper <AttrGroupEntity>().eq("catelog_id" , catelogId)); List<AttrGroupWithAttrsVo> collect = attrGroupEntityList.stream().map(group -> { AttrGroupWithAttrsVo attrsVo = new AttrGroupWithAttrsVo (); BeanUtils.copyProperties(group, attrsVo); List<AttrEntity> attrs = attrService.getRelationAttr(attrsVo.getAttrGroupId()); attrsVo.setAttrs(attrs); return attrsVo; }).collect(Collectors.toList()); return collect; }
mysql 默认的隔离级别为读已提交,为了能够在调试过程中,获取到数据库中的数据信息,可以调整隔离级别为读未提交:
1 SET SESSION TRANSACTION ISOLATION LEVEL READ UNCOMMITTED;
但是它对于当前的事务窗口生效,如果想要设置全局的,需要加上 global 字段。
4、保存 SPU 的基本信息 先创建以下 VO 对象
在保存 SPU 界面,使用 F12 调出控制台获取页面存储的 json 数据,把数据复制出来使用 json 工具把它装换成 java 实体类(VO)
JSON 工具 :https://www.bejson.com/ ,转换好了以后 生成 javabean 在点击下载代码 即可。
生成bean
修改:
double 改为 BigDecimal int 改为 Long 去掉 get、set 方法 使用 @Data 注解 Sup 功能实现
1 2 3 4 5 6 7 8 9 10 11 @RequestMapping("/save") public R save (@RequestBody SpuSaveVo vo) { spuInfoService.saveSpuInfo(vo); return R.ok(); }
SpuInfoServiceImpl.java ( 注意 saveSpuInfo 中 所有需要调用其他模块的实现类,我已经按顺序写出来 ) 1 2 3 4 5 6 7 8 9 10 11 12 13 14 15 16 17 18 19 20 21 22 23 24 25 26 27 28 29 30 31 32 33 34 35 36 37 38 39 40 41 42 43 44 45 46 47 48 49 50 51 52 53 54 55 56 57 58 59 60 61 62 63 64 65 66 67 68 69 70 71 72 73 74 75 76 77 78 79 80 81 82 83 84 85 86 87 88 89 90 91 92 93 94 95 96 97 98 99 100 101 102 103 104 105 106 107 108 109 110 111 112 113 114 115 116 117 118 119 120 121 122 123 124 125 126 127 128 129 130 131 132 133 134 135 136 137 138 139 140 141 142 143 144 145 146 147 148 @Autowired private SpuInfoDescService spuInfoDescService;@Autowired private SpuImagesService imagesService;@Autowired AttrService attrService; @Autowired CouponFeignService couponFeignService; @Autowired SkuImagesService skuImagesService; @Autowired SkuInfoService skuInfoService; @Autowired ProductAttrValueService attrValueService; @Autowired SkuSaleAttrValueService skuSaleAttrValueService; @Transactional @Override public void saveSpuInfo (SpuSaveVo vo) { SpuInfoEntity infoEntity = new SpuInfoEntity (); BeanUtils.copyProperties(vo,infoEntity); infoEntity.setCreateTime(new Date ()); infoEntity.setUpdateTime(new Date ()); this .saveBaseSpuInfo(infoEntity); List<String> decript = vo.getDecript(); SpuInfoDescEntity descEntity = new SpuInfoDescEntity (); descEntity.setSpuId(infoEntity.getId()); descEntity.setDecript(String.join("," ,decript)); spuInfoDescService.saveSpuInfoDesc(descEntity); List<String> images = vo.getImages(); imagesService.saveImages(infoEntity.getId(),images); List<BaseAttrs> baseAttrs = vo.getBaseAttrs(); List<ProductAttrValueEntity> collect = baseAttrs.stream().map(attr -> { ProductAttrValueEntity valueEntity = new ProductAttrValueEntity (); valueEntity.setAttrId(attr.getAttrId()); AttrEntity id = attrService.getById(attr.getAttrId()); valueEntity.setAttrName(id.getAttrName()); valueEntity.setAttrValue(attr.getAttrValues()); valueEntity.setQuickShow(attr.getShowDesc()); valueEntity.setSpuId(infoEntity.getId()); return valueEntity; }).collect(Collectors.toList()); attrValueService.saveProductAttr(collect); Bounds bounds = vo.getBounds(); SpuBoundTo spuBoundTo = new SpuBoundTo (); BeanUtils.copyProperties(bounds,spuBoundTo); spuBoundTo.setSpuId(infoEntity.getId()); R r = couponFeignService.saveSpuBounds(spuBoundTo); if (r.getCode() != 0 ){ log.error("远程保存spu积分信息失败" ); } List<Skus> skus = vo.getSkus(); if (skus!=null && skus.size()>0 ){ skus.forEach(item->{ String defaultImg = "" ; for (Images image : item.getImages()) { if (image.getDefaultImg() == 1 ){ defaultImg = image.getImgUrl(); } } SkuInfoEntity skuInfoEntity = new SkuInfoEntity (); BeanUtils.copyProperties(item,skuInfoEntity); skuInfoEntity.setBrandId(infoEntity.getBrandId()); skuInfoEntity.setCatalogId(infoEntity.getCatalogId()); skuInfoEntity.setSaleCount(0L ); skuInfoEntity.setSpuId(infoEntity.getId()); skuInfoEntity.setSkuDefaultImg(defaultImg); skuInfoService.saveSkuInfo(skuInfoEntity); Long skuId = skuInfoEntity.getSkuId(); List<SkuImagesEntity> imagesEntities = item.getImages().stream().map(img -> { SkuImagesEntity skuImagesEntity = new SkuImagesEntity (); skuImagesEntity.setSkuId(skuId); skuImagesEntity.setImgUrl(img.getImgUrl()); skuImagesEntity.setDefaultImg(img.getDefaultImg()); return skuImagesEntity; }).filter(entity->{ return !StringUtils.isEmpty(entity.getImgUrl()); }).collect(Collectors.toList()); skuImagesService.saveBatch(imagesEntities); List<Attr> attr = item.getAttr(); List<SkuSaleAttrValueEntity> skuSaleAttrValueEntities = attr.stream().map(a -> { SkuSaleAttrValueEntity attrValueEntity = new SkuSaleAttrValueEntity (); BeanUtils.copyProperties(a, attrValueEntity); attrValueEntity.setSkuId(skuId); return attrValueEntity; }).collect(Collectors.toList()); skuSaleAttrValueService.saveBatch(skuSaleAttrValueEntities); SkuReductionTo skuReductionTo = new SkuReductionTo (); BeanUtils.copyProperties(item,skuReductionTo); skuReductionTo.setSkuId(skuId); if (skuReductionTo.getFullCount() >0 || skuReductionTo.getFullPrice().compareTo(new BigDecimal ("0" )) == 1 ){ R r1 = couponFeignService.saveSkuReduction(skuReductionTo); if (r1.getCode() != 0 ){ log.error("远程保存sku优惠信息失败" ); } } }); } } @Override public void saveBaseSpuInfo (SpuInfoEntity infoEntity) { this .baseMapper.insert(infoEntity); }
SpuInfoDescServiceImpl.java 1 2 3 4 @Override public void saveSpuInfoDesc (SpuInfoDescEntity descEntity) { this .baseMapper.insert(descEntity); }
SpuImagesServiceImpl.java 1 2 3 4 5 6 7 8 9 10 11 12 13 14 15 16 @Override public void saveImages (Long id, List<String> images) { if (images == null || images.size() == 0 ){ return ; }else { List<SpuImagesEntity> collect = images.stream().map(img -> { SpuImagesEntity spuImagesEntity = new SpuImagesEntity (); spuImagesEntity.setSpuId(id); spuImagesEntity.setImgUrl(img); return spuImagesEntity; }).collect(Collectors.toList()); this .saveBatch(collect); } }
1 2 3 4 5 6 7 8 9 10 11 12 13 14 15 16 17 18 19 20 21 22 23 24 25 26 27 28 29 @Data public class SpuBoundTo { private Long spuId; private BigDecimal buyBounds; private BigDecimal growBounds; } @Data public class MemberPrice { private Long id; private String name; private BigDecimal price; } @Data public class SkuReductionTo { private Long skuId; private int fullCount; private BigDecimal discount; private int countStatus; private BigDecimal fullPrice; private BigDecimal reducePrice; private int priceStatus; private List<MemberPrice> memberPrice; }
1 2 3 4 @Override public void saveSkuInfo (SkuInfoEntity skuInfoEntity) { this .baseMapper.insert(skuInfoEntity); }
创建 feign 接口远程调用 gulimall-coupon 1 2 3 4 5 6 7 8 9 @FeignClient("gulimall-coupon") public interface CouponFeignService { @PostMapping("/coupon/spubounds/save") R saveSpuBounds (@RequestBody SpuBoundTo spuBoundTo) ; @PostMapping("/coupon/skufullreduction/saveinfo") R saveSkuReduction (@RequestBody SkuReductionTo skuReductionTo) ; }
gulimall-coupon 模块方法实现
1 2 3 4 5 6 7 8 9 10 11 12 13 14 15 16 17 18 19 20 21 22 23 24 25 26 27 28 29 30 31 32 33 34 35 36 37 38 39 40 41 42 43 44 45 46 47 48 49 50 51 52 53 54 55 56 57 58 @RequestMapping("/save") public R save (@RequestBody SpuBoundsEntity spuBounds) { spuBoundsService.save(spuBounds); return R.ok(); } @PostMapping("/saveinfo") public R saveInfo (@RequestBody SkuReductionTo reductionTo) { skuFullReductionService.saveSkuReduction(reductionTo); return R.ok(); } @Override public void saveSkuReduction (SkuReductionTo reductionTo) { SkuLadderEntity skuLadderEntity = new SkuLadderEntity (); skuLadderEntity.setSkuId(reductionTo.getSkuId()); skuLadderEntity.setFullCount(reductionTo.getFullCount()); skuLadderEntity.setDiscount(reductionTo.getDiscount()); skuLadderEntity.setAddOther(reductionTo.getCountStatus()); if (reductionTo.getCountStatus() > 0 ){ skuLadderService.save(skuLadderEntity); } SkuFullReductionEntity reductionEntity = new SkuFullReductionEntity (); BeanUtils.copyProperties(reductionTo,reductionEntity); if (reductionEntity.getFullPrice().compareTo(new BigDecimal ("0" )) == 1 ){ this .save(reductionEntity); } List<MemberPrice> memberPrice = reductionTo.getMemberPrice(); List<MemberPriceEntity> collect = memberPrice.stream().map(item -> { MemberPriceEntity priceEntity = new MemberPriceEntity (); priceEntity.setSkuId(reductionEntity.getSkuId()); priceEntity.setMemberLevelId(item.getId()); priceEntity.setMemberLevelName(item.getName()); priceEntity.setMemberPrice(item.getPrice()); priceEntity.setAddOther(1 ); return priceEntity; }).filter(item -> { return item.getMemberPrice().compareTo(new BigDecimal ("0" )) == 1 ; }).collect(Collectors.toList()); memberPriceService.saveBatch(collect); }
4.1、新增商品 BUG 汇总 修改 mysql 默认隔离级别,测试接口 1 2 / / 将当前会话隔离级别等级设置成读未提交,可以读到未提交的数据SET SESSION TRANSACTION ISOLATION LEVEL READ UNCOMMITTED;
插入的时候省略了 id 列,mybatis 将其当做自增列 SpuInfoDescEntity.java
1 2 @TableId(type = IdType.INPUT) private Long spuId;
过滤掉 sku 默认未选中图片 1 2 3 4 5 6 7 8 9 10 List<SkuImagesEntity> skuImagesEntities = item.getImages().stream().map(image -> { SkuImagesEntity skuImagesEntity = new SkuImagesEntity (); skuImagesEntity.setSkuId(skuId); skuImagesEntity.setImgUrl(image.getImgUrl()); skuImagesEntity.setDefaultImg(image.getDefaultImg()); return skuImagesEntity; }).filter(entity->{ return !StringUtils.isEmpty(entity.getImgUrl()); }).collect(Collectors.toList());
优惠无意义数据 5、spu 管理 5.1、SPU 检索 时间格式化
接口文档:https://easydoc.xyz/s/78237135/ZUqEdvA4/9LISLvy7
时间格式化:
1 2 3 4 spring: jackson: date-format: yyyy-MM-dd HH:mm:ss time-zone: GMT+8
SPU 检索
1 2 3 4 5 6 7 8 9 10 11 12 13 14 15 16 17 18 19 20 21 22 23 24 25 26 27 28 29 30 31 32 33 34 35 36 37 38 39 40 41 42 43 44 45 46 47 48 49 50 51 52 53 @RequestMapping("/list") public R list (@RequestParam Map<String, Object> params) { PageUtils page = spuInfoService.queryPageCondition(params); return R.ok().put("page" , page); } @Override public PageUtils queryPageCondition (Map<String, Object> params) { QueryWrapper<SpuInfoEntity> wrapper= new QueryWrapper <>(); String key = (String) params.get("key" ); if (!StringUtils.isEmpty(key)){ wrapper.and((w) -> { w.eq("id" ,key).or().like("spu_name" ,key); }); } String status = (String) params.get("status" ); if (!StringUtils.isEmpty(status)){ wrapper.eq("publish_status" ,status); } String brandId = (String) params.get("brandId" ); if (!StringUtils.isEmpty(brandId)&&!"0" .equalsIgnoreCase(brandId)){ wrapper.eq("brand_id" ,brandId); } String catelogId = (String) params.get("catelogId" ); if (!StringUtils.isEmpty(catelogId)&&!"0" .equalsIgnoreCase(catelogId)){ wrapper.eq("catalog_id" ,catelogId); } IPage<SpuInfoEntity> page = this .page( new Query <SpuInfoEntity>().getPage(params), wrapper ); return new PageUtils (page); }
5.2 、获取 spu 规格 接口文档:https://easydoc.xyz/s/78237135/ZUqEdvA4/GhhJhkg7
1 2 3 4 5 6 7 8 9 10 11 12 13 14 15 16 17 18 19 20 @Autowired ProductAttrValueService productAttrValueService; @GetMapping("/base/listforspu/{spuId}") public R baseAttrlistforsup (@PathVariable("spuId") Long spuId) { List<ProductAttrValueEntity> entities = productAttrValueService.baseAttrlistforspu(spuId); return R.ok().put("data" ,entities); } @Override public List<ProductAttrValueEntity> baseAttrlistforspu (Long spuId) { List<ProductAttrValueEntity> entities = this .baseMapper.selectList(new QueryWrapper <ProductAttrValueEntity>().eq("spu_id" , spuId)); return entities; }
测试 :GET localhost:88/api/product/attr/base/listforspu/7
问题现象:
出现问题的代码:
1 2 3 4 5 6 7 attrUpdateShow (row ) { console .log (row); this .$router .push ({ path : "/product-attrupdate" , query : { spuId : row.id , catalogId : row.catalogId } }); },
暂时不知道如何解决问题。只能留待以后解决。经过测试发现,问题和上面的代码没有关系,问题出现在“attrupdate.vue”上,该 vue 页面无法通过浏览器访问,当输入访问 URL( http://localhost:8001/#/product-attrupdate )的时候,就会出现 404,而其他的请求则不会出现这种情况,不知为何。
通过 POSTMAN 进行请求的时候,能够请求到数据。
经过分析发现,是因为在数据库中没有该页面的导航所导致的,为了修正这个问题,可以在“sys-menu”表中添加一行,内容位:
这样当再次访问的时候,在“平台属性”下,会出现“规格维护”菜单,
当再次点击“规格”的时候,显示出菜单
不过这种菜单并不符合我们的需要,我们需要让它以弹出框的形式出现。
5.3、修改商品价格 接口文档: https://easydoc.xyz/s/78237135/ZUqEdvA4/GhnJ0L85
1 2 3 4 5 6 7 8 9 10 11 12 13 14 15 16 17 18 19 20 21 22 23 24 25 @PostMapping("/update/{spuId}") public R updateSpuAttr (@PathVariable("spuId") Long spuId, @RequestBody List<ProductAttrValueEntity> entities) { productAttrValueService.updateSpuAttr(spuId,entities); return R.ok(); } @Transactional @Override public void updateSpuAttr (Long spuId, List<ProductAttrValueEntity> entities) { this .baseMapper.delete(new QueryWrapper <ProductAttrValueEntity>().eq("spu_id" , spuId)); List<ProductAttrValueEntity> collect = entities.stream().map(item -> { item.setSpuId(spuId); return item; }).collect(Collectors.toList()); this .saveBatch(collect); }
测试 : POST localhost:88/api/product/attr/update/7
响应数据:
1 2 3 4 5 6 7 8 9 10 11 12 13 14 [ { "attrId" : 7 , "attrName" : "CPU型号" , "attrValue" : "麒麟990" , "quickShow" : 0 } , { "attrId" : 8 , "attrName" : "CPU工艺" , "attrValue" : "7nm" , "quickShow" : 1 } ]
5.4 、商品上架 接口文档: https://easydoc.xyz/s/78237135/ZUqEdvA4/DhOtFr4A
对原有接口进行了修改: 添加了下架功能
supinfo.vue
1 2 3 4 5 6 7 8 9 10 11 12 13 14 15 16 17 18 19 20 21 22 23 <el-table-column fixed="right" header-align="center" align="center" width="150" label="操作" > <template slot-scope="scope"> <el-button v-if="scope.row.publishStatus == 0 || scope.row.publishStatus == 2" type="text" size="small" @click="productUp(scope.row.id , scope.row.publishStatus)" >上架</el-button> <el-button v-if="scope.row.publishStatus == 1" type="text" size="small" @click="productUp(scope.row.id, scope.row.publishStatus)" >下架</el-button> <el-button type="text" size="small" @click="attrUpdateShow(scope.row)">规格</el-button> </template> </el-table-column>
1 2 3 4 5 data() { return { // 定义了 AttrType 属性 AttrType: "", dataSub: null, .... }; }, methods: { productUp(id, publishStatus) { console.log("============", publishStatus); if (publishStatus === 0 || publishStatus === 2) { this.AttrType = "up"; } if (publishStatus === 1) { this.AttrType = "down"; } this.$http({ url: this.$http.adornUrl(`/product/spuinfo/${id}/${this.AttrType}`),
1 2 3 4 5 6 7 8 9 10 11 12 13 14 15 16 17 18 19 20 @PostMapping("/{spuId}/{AttrType}") public R StatusUp (@PathVariable("spuId") Long spuId,@PathVariable String AttrType ) { spuInfoService.hasPublishStatus(spuId,AttrType); return R.ok(); } @Override public void hasPublishStatus (Long spuId, String attrType) { SpuInfoEntity spuInfoEntity = new SpuInfoEntity (); if ("up" .equalsIgnoreCase(attrType)){ spuInfoEntity.setPublishStatus(1 ); } if ("down" .equalsIgnoreCase(attrType)){ spuInfoEntity.setPublishStatus(2 ); } this .baseMapper.update(spuInfoEntity,new QueryWrapper <SpuInfoEntity>().eq("id" ,spuId)); }
十八、 仓库管理 首先配置好 yml、properties 文件中需要的配置,注册进 nacos 中,然后网关中也需要配置好
1 2 3 4 5 6 7 8 9 10 11 12 13 14 15 spring.application.name =gulimall-ware spring.cloud.nacos.config.server-addr =127.0.0.1:8848 spring.cloud.nacos.config.namespace =a8106f50-a70a-4cef-a466-805f801a49d1 server.port =11000 spring.cloud.nacos.config.ext-config[0].data-id =gulimall-ware.yml spring.cloud.nacos.config.ext-config[0].group =DEFAULT_GROUP spring.cloud.nacos.config.ext-config[0].refresh =true
网关:
1 2 3 4 5 6 - id: gulimall-ware uri: lb://gulimall-ware predicates: - Path=/api/ware/** filters: - RewritePath=/api/(?<segment>/?.*),/$\{segment}
1、仓库列表功能 接口文档:https://easydoc.xyz/s/78237135/ZUqEdvA4/mZgdqOWe
1 2 3 4 5 6 7 8 9 10 11 12 13 14 15 16 17 18 19 20 @Override public PageUtils queryPage (Map<String, Object> params) { QueryWrapper<WareInfoEntity> wrapper = new QueryWrapper <>(); String key = (String) params.get("key" ); if (!StringUtils.isEmpty(key)){ wrapper.eq("id" ,key).or() .like("name" ,key) .or().like("address" ,key) .or().like("areacode" ,key); } IPage<WareInfoEntity> page = this .page( new Query <WareInfoEntity>().getPage(params), wrapper ); return new PageUtils (page); }
2、查询商品库存 接口文档:https://easydoc.xyz/s/78237135/ZUqEdvA4/hwXrEXBZ
访问地址: /ware/waresku/list
1 2 3 4 5 6 7 8 9 10 11 12 13 14 15 16 17 18 19 20 21 22 23 24 25 @Override public PageUtils queryPage (Map<String, Object> params) { QueryWrapper<WareSkuEntity> queryWrapper = new QueryWrapper <>(); String skuId = (String) params.get("skuId" ); if (!StringUtils.isEmpty(skuId)){ queryWrapper.eq("sku_id" ,skuId); } String wareId = (String) params.get("wareId" ); if (!StringUtils.isEmpty(wareId)){ queryWrapper.eq("ware_id" ,wareId); } IPage<WareSkuEntity> page = this .page( new Query <WareSkuEntity>().getPage(params), queryWrapper ); return new PageUtils (page); }
3、采购单维护 3.1 、采购需求 指定采购数量
1 2 3 两种创建逻辑: 1、后台新增采购需求【人工】 2、后台库存预警自动发出采购需求【自动化】
接口文档: https://easydoc.xyz/s/78237135/ZUqEdvA4/Ss4zsV7R
访问路径: /ware/purchasedetail/list
1 2 3 4 5 6 7 8 9 10 11 12 13 14 15 16 17 18 19 20 21 22 23 24 25 26 27 28 29 30 31 32 33 34 35 36 37 38 39 @Override public PageUtils queryPage (Map<String, Object> params) { QueryWrapper<PurchaseDetailEntity> queryWrapper = new QueryWrapper <>(); String key = (String) params.get("key" ); if (!StringUtils.isEmpty(key)){ queryWrapper.and(w -> { w.eq("purchase_id" ,key).or().eq("sku_id" ,key); }); } String status = (String) params.get("status" ); if (!StringUtils.isEmpty(status)){ queryWrapper.eq("status" ,status); } String wareId = (String) params.get("wareId" ); if (!StringUtils.isEmpty(wareId)){ queryWrapper.eq("ware_id" ,wareId); } IPage<PurchaseDetailEntity> page = this .page( new Query <PurchaseDetailEntity>().getPage(params), queryWrapper ); return new PageUtils (page); }
3.2、合并采购需求 接口文档:https://easydoc.xyz/s/78237135/ZUqEdvA4/cUlv9QvK
访问路径:/ware/purchase/merge
先要有一个采购单,再选中多个采购需求整合到某个采购单中新增一个采购单,同时分配采购人员
采购单状态:新建、已分配、已领取、已完成、有异常 点击整合,查询未领取的采购单【新建+已分配 状态的采购单】,这些采购单允许合并,已领取的单子不能再作为合并对象。
1 2 3 4 5 6 7 8 9 10 11 12 13 14 15 16 17 @PostMapping("/merge") public R merge (@RequestBody MergeVo mergeVo) { purchaseService.mergePurchase(mergeVo); return R.ok(); } @RequestMapping("/save") public R save (@RequestBody PurchaseEntity purchase) { purchase.setUpdateTime(new Date ()); purchase.setCreateTime(new Date ()); purchaseService.save(purchase); return R.ok(); }
1 2 3 4 5 6 7 8 9 10 11 12 13 14 15 16 17 18 19 20 21 22 23 24 25 26 27 28 29 30 31 32 33 34 35 36 37 38 39 40 41 42 43 44 45 46 47 48 49 50 51 52 53 @Autowired private PurchaseDetailService purchaseDetailService;@Transactional @Override public void mergePurchase (MergeVo mergeVo) { boolean isMerge = true ; List<Long> items = mergeVo.getItems(); if (!CollectionUtils.isEmpty(items)){ List<PurchaseDetailEntity> byIds = purchaseDetailService.listByIds(items); for (int i = 0 ; i < byIds.size(); i++){ if (byIds.get(i).getStatus() != WareConstant.PurchaseDetailStatusEnum.CREATED.getCode() && byIds.get(i).getStatus() != WareConstant.PurchaseDetailStatusEnum.ASSIGNED.getCode() ){ isMerge = false ; break ; } } }else { isMerge = false ; } if (isMerge){ Long purchaseId = mergeVo.getPurchaseId(); if (purchaseId == null ){ PurchaseEntity purchaseEntity = new PurchaseEntity (); purchaseEntity.setStatus(WareConstant.PurchaseStatusEnum.CREATED.getCode()); purchaseEntity.setCreateTime(new Date ()); purchaseEntity.setUpdateTime(new Date ()); this .save(purchaseEntity); purchaseId = purchaseEntity.getId(); } items = mergeVo.getItems(); Long finalPurchaseId = purchaseId; List<PurchaseDetailEntity> collect = items.stream().map(i -> { PurchaseDetailEntity detailEntity = new PurchaseDetailEntity (); detailEntity.setId(i); detailEntity.setPurchaseId(finalPurchaseId); detailEntity.setStatus(WareConstant.PurchaseDetailStatusEnum.ASSIGNED.getCode()); return detailEntity; }).collect(Collectors.toList()); purchaseDetailService.updateBatchById(collect); PurchaseEntity purchaseEntity = new PurchaseEntity (); purchaseEntity.setId(purchaseId); purchaseEntity.setUpdateTime(new Date ()); this .updateById(purchaseEntity); } }
3.3、查询未领取的采购单 接口文档:https://easydoc.xyz/s/78237135/ZUqEdvA4/hI12DNrH
访问地址:/ware/purchase/unreceive/list
1 2 3 4 5 6 @RequestMapping("/unreceive/list") public R unreceivelist (@RequestParam Map<String, Object> params) { PageUtils page = purchaseService.queryPageUnreceivePurchase(params); return R.ok().put("page" , page); }
1 2 3 4 5 6 7 8 9 @Override public PageUtils queryPageUnreceivePurchase (Map<String, Object> params) { IPage<PurchaseEntity> page = this .page( new Query <PurchaseEntity>().getPage(params), new QueryWrapper <PurchaseEntity>().eq("status" ,0 ).or().eq("status" ,1 ) ); return new PageUtils (page); }
3.4、领取采购单 接口文档:https://easydoc.xyz/s/78237135/ZUqEdvA4/vXMBBgw1
访问地址:/ware/purchase/received
领取流程:
采购人员在手机 app 上看到自己的采购单,然后点击 领取【采购单状态变为已领取】
已领取的采购单 不能在继续分配 采配需求
被采购人员点击领取的采购单,关联的采购需求要同步修改为正在采购【采购单(已领取)== 采购需求(正在采购)】
注意: 需要测试领取是否成功之前需要先合并一个采购单。_怎么合并请这篇博客_:合并采购需求
1 2 3 4 5 6 @PostMapping("/received") public R received (@RequestBody List<Long> ids) { purchaseService.received(ids); return R.ok(); }
1 2 3 4 5 6 7 8 9 10 11 12 13 14 15 16 17 18 19 20 21 22 23 24 25 26 27 28 29 30 31 32 33 @Override public void received (List<Long> ids) { List<PurchaseEntity> collect = ids.stream().map(id -> { PurchaseEntity byId = this .getById(id); return byId; }).filter(item -> { if (item.getStatus() == WareConstant.PurchaseStatusEnum.CREATED.getCode() || item.getStatus() == WareConstant.PurchaseStatusEnum.ASSIGNED.getCode()) { return true ; } return false ; }).map(item -> { item.setStatus(WareConstant.PurchaseStatusEnum.RECEIVE.getCode()); item.setUpdateTime(new Date ()); return item; }).collect(Collectors.toList()); this .updateBatchById(collect); collect.forEach((item) -> { List<PurchaseDetailEntity> entities = purchaseDetailService.listDetailByPuchaseId(item.getId()); List<PurchaseDetailEntity> detailEntities = entities.stream().map(items -> { PurchaseDetailEntity entity = new PurchaseDetailEntity (); entity.setId(items.getId()); entity.setStatus(WareConstant.PurchaseDetailStatusEnum.BUYING.getCode()); return entity; }).collect(Collectors.toList()); purchaseDetailService.updateBatchById(detailEntities); }); }
PurchaseDetailServiceImpl.java 1 2 3 4 5 @Override public List<PurchaseDetailEntity> listDetailByPuchaseId (Long id) { List<PurchaseDetailEntity> purchase_id = this .list(new QueryWrapper <PurchaseDetailEntity>().eq("purchase_id" , id)); return purchase_id; }
测试:
访问地址:localhost:88/api/ware/purchase/received
响应结果:
1 2 3 4 { "msg" : "success" , "code" : 0 }
3.5、完成采购 接口文档:https://easydoc.xyz/s/78237135/ZUqEdvA4/cTQHGXbK
访问地址:/ware/purchase/done
提交了每个采购需求的状态【status,所以完成采购单,但是采购需求可能失败】 ware 模块中创建两个 Vo
1 2 3 4 5 6 7 8 9 10 11 12 13 14 15 16 @Data public class PurchaseDoneVo { @NotNull private Long id; private List<PurchaseItemDoneVo> items; } @Data public class PurchaseItemDoneVo { private Long itemId; private Integer status; private String reason; }
1 2 3 4 5 6 @PostMapping("/done") public R finish (@RequestBody PurchaseDoneVo doneVo) { purchaseService.done(doneVo); return R.ok(); }
1 2 3 4 5 6 7 8 9 10 11 12 13 14 15 16 17 18 19 20 21 22 23 24 25 26 27 28 29 30 31 32 33 34 35 36 37 38 39 @Transactional @Override public void done (PurchaseDoneVo doneVo) { Long id = doneVo.getId(); Boolean flag = true ; List<PurchaseItemDoneVo> items = doneVo.getItems(); List<PurchaseDetailEntity> updates = new ArrayList <>(); for (PurchaseItemDoneVo item : items){ PurchaseDetailEntity detailEntity = new PurchaseDetailEntity (); if (item.getStatus() == WareConstant.PurchaseDetailStatusEnum.HASERROR.getCode()){ flag = false ; detailEntity.setStatus(item.getStatus()); }else { detailEntity.setStatus(WareConstant.PurchaseDetailStatusEnum.FINISH.getCode()); PurchaseDetailEntity entity = purchaseDetailService.getById(item.getItemId()); wareSkuService.addStock(entity.getSkuId(),entity.getWareId(),entity.getSkuNum()); } detailEntity.setId(item.getItemId()); updates.add(detailEntity); } purchaseDetailService.updateBatchById(updates); PurchaseEntity purchaseEntity = new PurchaseEntity (); purchaseEntity.setId(id); purchaseEntity.setStatus(flag?WareConstant.PurchaseStatusEnum.FINISH.getCode():WareConstant.PurchaseStatusEnum.HASERROR.getCode()); purchaseEntity.setUpdateTime(new Date ()); this .updateById(purchaseEntity); }
1 2 3 4 5 6 7 8 9 10 11 12 13 14 15 16 17 18 19 20 21 22 23 24 25 26 27 28 29 30 @Override public void addStock (Long skuId, Long wareId, Integer skuNum) { List<WareSkuEntity> entities = wareSkuDao.selectList(new QueryWrapper <WareSkuEntity>().eq("ware_id" , wareId)); if (entities == null || entities.size() == 0 ){ WareSkuEntity skuEntity = new WareSkuEntity (); skuEntity.setSkuId(skuId); skuEntity.setStock(skuNum); skuEntity.setWareId(wareId); skuEntity.setStockLocked(0 ); try { R info = productFeignService.info(skuId); Map<String,Object> data = (Map<String, Object>) info.get("skuInfo" ); if (info.getCode() == 0 ){ skuEntity.setSkuName((String) data.get("skuName" )); } } catch (Exception e) { } wareSkuDao.insert(skuEntity); }else { wareSkuDao.addStock(skuId,wareId,skuNum); } }
productFeignService.java
1 2 3 4 5 6 @FeignClient("gulimall-product") public interface ProductFeignService { @RequestMapping("/product/skuinfo/info/{skuId}") public R info (@PathVariable("skuId") Long skuId) ; }
WareSkuDao.java
1 2 3 4 5 6 @Mapper public interface WareSkuDao extends BaseMapper <WareSkuEntity> { void addStock (@Param("skuId") Long skuId, @Param("wareId") Long wareId, @Param("skuNum") Integer skuNum) ; }
WareSkuDao.xml
1 2 3 <update id ="addStock" > UPDATE `wms_ware_sku` SET stock=stock+#{skuNum} WHERE sku_id=#{skuId} AND ware_id=#{wareId} </update >
测试:
测试地址:localhost:88/api/ware/purchase/done
1 2 3 4 5 6 7 { "id" : 12 , "items" : [ { "itemId" : 16 , "status" : 4 , "reason" : "缺货" } , { "itemId" : 15 , "status" : 3 } ] }
响应数据:
十九、分布式基础篇总结

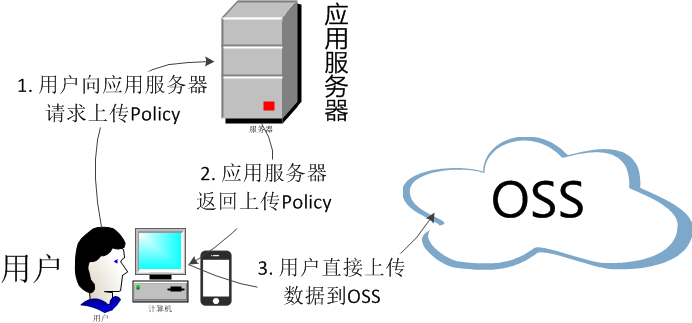
 微信
微信 支付宝
支付宝